Since my kids are learning the Dutch and the Hungarian alphabet at the same time, I just wanted to create alphabet posters for them —not only showcasing the letters itself but also the wide variety of their forms. Therefore I have juxtaposed various serif, sans-serif, traditional and modern font families featuring both uppercase and lowercase letters. This poster is intended to be printed out in DIN A2 size, and there are two: Dutch/English and Hungarian variants. The Hungarian alphabet lists all the specific Hungarian letters, but I haven’t included the letter face variants for digraphs, trigraphs and the letters with special Hungarian diacritic marks — on one hand, to clearly show the difference between the two alphabets, and on the other hand to keep it simple, as digraphs would not have easily fit in the schema.
Fonts used in these alphabets
Blogger Sans: For the big letters, I wanted to use something very minimalistic yet elegant.
Bodoni 72: I found this serif typeface already installed on my Mac, perhaps a little bit narrow, but classic.
Fertigo Pro: This is one of my favourite (free) typefaces. If you put it next to a classical serif and a geometric sans-serif, it really seems to be somewhere in-between.
Futura: Perhaps the most puristic and minimalistic font family.
UnifracturCook: Since the main goal of this alphabet is to showcase typographic diversity, I could not miss a blackletter (fraktur) typeface, even if my kids won’t see many of these glyphs too often.
Apple Chancery: I also wanted to include calligraphic fonts, and this one was installed on my computer too.
Luminari: Yet another example of typefaces amalgamating Middle Ages writing styles, adding totally different glyphs for lettera and g for instance.
Press Start 2P: for the sake of diversity again, an early digital typeface, can be considered also historical nowadays, showing the bare essence of every uppercase and lowercase letter.
Ultra: again and extremity, this time in terms of boldness. These letter faces look so different, but they will also help my kids to easily recognise these forms too.
As I have had quite a few, complex Plone sites, none of the proposed methods I found on the net would have been useful for me. Some of my sites had a complex subsystem built with Plomino – a kind of CMS in a CMS, while other sites had a forum or a multilingual structure, therefore I had to resort to fire up my beloved web automation tools and build my own scripts to export Plone content in a structured format and import it in my WordPress sites. This article will describe a unique method of exporting a Plone site with web scraping tools and importing it into a WordPress site – a process which could be adapted to practically any kind of CMSes and any type of website migrations.
Why is this method so unique?
I am imitating a human being during the whole migration process, that is visiting every web page or its editing interface and the site’s management interface to extract the necessary information. Then, in the second step, the content is entered to the new site just like an ordinary web editor would do: by pushing the appropriate buttons, typing in the text and filling in other fields of a page/post edit screen. I am just speeding up the whole process by automating this process with my web automation tools. All in all, instead of querying databases, executing SQL commands, filtering and normalizing data, using import/export add-ons, I am dealing with the ordinary web interfaces of both the new and the old site during the whole migration process. The disadvantage of this process is that it is way slower, but its advantage is that you can do whatever you want.
Complexity of Plone and the export process
You might have read the logic behind how I had exported the whole content of a Zwiki-based site, but exporting all kind of content from a Plone site resulted in a much more difficult process. The main difference between a simple CMS – like Zwiki – and Plone is that the latter has various content types – both folder-like content types (that is a content which can contain other content elements) and document-like content types. And each of them has a bunch of special fields. Also listing every piece of content was not that easy either, as a Plone site does not have an extensive Table of Contents-like page where every content item is listed — unlike the wiki-based sites.
Step #1: Scraping the old Plone site
a.) getting a list of every content item
First I thought that I would create a script which could scrape every published content from the site without having an administrator access. In that case what my script should have done is to go to the advanced search form, check all available content types and run a search without a search keyword, then go through the result pages by keeping on pressing the next buttons. But I had to realize that there is a setting for each content type which controls whether that content type is searchable or not. Therefore, so as to get a full list of every content item, you should go to the settings page first and make every necessary content item searchable. Then I found out that the portal_catalog must have some bugs because I realized during the process that the advanced search was omitting a couple of content items – and I still could not figure out why.
Finally, I decided to get the list of every content item’s URL, therefore my script first visits the Zope Management Interface, creates a Python script with the following content:
for i in context.portal_catalog.searchResults(Language=''): print i.getURL()
return printed
Then it runs the above script and saves the output of the whole list of URLs in a text file.
b.) getting all the attributes
First I thought that it would be enough to open the edit page of every content item ( {-Variable.url-}/edit ), because every attribute could be extracted from there, but it turned out that for instance the Last Modified date is not listed there, or at least I could not find it, so first I had to open up the ZMI at the {-Variable.url-}/manage_metadata screen to figure out this information. Also, the workflow status was easier to get from the {-Variable.url-}/manage_workflowsTab page.
But then the script opens the {-Variable.url-}/edit page and scrapes basically every input, textarea and select fields except the hidden ones, plus it gets the list of parents from the breadcrumb menu and computes the hierarchy level.
In the next step, it opens the folder content page of its parent ( {-Variable.url-}/../@@folder_contents?show_all=true ) to figure out the position of that content item in its folder, so that later the menu order could be set.
It also downloads images stored as leadImages for news items and similar content types, plus the image itself for the image content type into a similar folder structure to the site’s original folders.
Finally, it adds a new line to the .csv file containing all the common attributes plus the ones who are specific to certain content types. Because of these latter field categories, I always save in the following format: {field name}::{field value} pairs separated by tab characters.
Step #2: Uploading content to the new site
a.) working with the scraped data
Once every content item is scraped with the first script, it’s time to fire the second one. It will process the log file produced by the scraper script. As the first column contains the hierarchy level and the position in the folder, the whole list of items can be sorted so that the script will start uploading the items located in the site root, and continue with the contained items. There is also a check in the script so if a parent item is not found, then it will be skipped and logged – so that you can identify those content items which were not listed somehow (don’t ask me why) in the very first step by querying the Plone database.
b.) decide what to do with different content types
For some content types, like the Document and News Item, it is quite obvious what to do: you can pair the Title, Description/Excerpt and Body text. With some ”folderish” content types like the Folder and Ploneboard, the process can be quite similar.
I decided that I would not create a separate Page or Post for Images. Where they are embedded in documents, I will just upload them to WordPress’ Media Library and insert them as you would normally do with WordPress. But where images were just listed with a thumbnail-based folder view, there I would manually add a WordPress Gallery item to the parent page.
I had a couple of Link items, there I also opted for not creating a separate page/post for them, but rather listing these link items on their parent page, that is only adding a header, link and a description to the Body text of parent pages. I also did something similar with the PloneBoard forum conversations: while these were separate content items in Plone, I just concatenated them to one page in WordPress.
Apart from these modifications, I decided to skip the Topic and Collage items, on one hand, both serve for listing content on one page, and on the other hand they basically mean quite a difficult setup to reproduce: perhaps you can create something similar with the AutoNav plugin, but it is far from obvious, and therefore the better if you really do it manually – if you need to do it at all.
I decided to use Pages for every kind of content, even for the News Item content types used in the Blog section of the old Plone site. I opted for this because pages can have parents and menu (folder) order, similarly to Plone’s structure, but of course, based on the logic of your old site, they could be translated as Posts as well.
c.) Logging what has been uploaded
Once the post/page has been created, it is important to get its ID and log it along with the attributes of the original content. Later on, you can use this information if you want to replace internal links, and it is also important in case something goes wrong. Then you can remove all the uploaded content by their WordPress IDs, and restart the process.
d.) Debugging and error handling
One of the peculiar problems with this ”imitating a manual data extraction / manual data entry” is rooted in the fact that the process takes quite a lot of time. I guess every web page fails to load quite frequently, you just would not notice it as you are usually not downloading hundreds of pages from a server. But in our case, if a page is not loaded, then we can miss a certain piece of content – and believe me, this happens quite often. Therefore every script has to be written with this in mind.
The first, scraper script, for instance, can be restarted when an error occurs, but most importantly it won’t start the whole process from the start, just continue the process where it stopped, finding out the next thing to do by analysing the previously written log files.
But when you start uploading the stuff you want to migrate, errors might occur even more frequently. On one hand, you will be surprised how many times your website will fail to respond, fail to save your content. It’s because normally you never invoke that many web pages or you never try to save so many new pages to see your site dropping your request or failing to respond. On the other hand, when you start to create the content at the new site, only then you will see if something went wrong by scraping the content, or then you will figure out if you have forgotten to scrape a necessary information, etc. For all these reasons, the best thing is to run the upload process in debug mode – so you can effectively see which step is happening right now, and if a page is not loaded for some reason, you can go to the site and check whether the page has been uploaded, just the confirmation was not displayed, or you should restart the upload process of that item.
In addition to that, I had to create a short script which was used in case something went entirely wrong: it would just delete every previously uploaded page (sometimes when there are already other content items on the new page, it is not straightforward to find out which content should be deleted).
Step #3: postprocessing content
a.) updating internal links and image references
There are certain steps you can accomplish only when every content item is already uploaded to the new site: for instance replacing the URLs of old internal links to the new WordPress ID-based links (which is better to use than the permalinks, just because if you, later on, fancy to restructure the migrated site, you will not break any internal link).
Therefore the post-processing script will open every uploaded content item for editing, gather all the URLs in href (and src) attributes, and replace them with the {-Variable.domainprefix-}{-Variable.domain-}/?p={-Variable.postid-} URLs. Things become tricky if originally relative URLs have been used – even more tricky when you consider Zope’s interesting concept called inheritance, so it’s better to translate relative URLs to absolute URLs before you attempt to find the WordPress ID belonging to the referenced content item in the log of the uploaded content.
When it is about replacing the URL of an embedded image (that is changing the reference from the old site to the new one), it is advisable to open the media item’s edit page: {-Variable.domain-}/wp-admin/post.php?post={-Variable.postid-}&action=edit and figure out the image’s file name as it is uploaded.
b.) handling private content items
There is also one more thing to do if you happen to have some content on the old site hidden from the public. Unfortunately, there is a WordPress bug, which has not been fixed during the last eight years: https://core.trac.wordpress.org/ticket/8592 . That prevents me from setting private status right when I upload the content in the previous step. The problem is rooted in the fact that if a parent page’s visibility is set to private, it will not show up in the dropdown list of parent pages on the edit screen either when you open one of the private page’s siblings, or if you plan to create a new sibling page. Therefore editing a page with a parent page having a private status will change the page’s parent to root – and similarly, your recently uploaded page will be created in the site’s root.
In theory, you could install a plugin called Inclusive Parents, but in practice, your site will throw frequent errors when you resort to this kind of ”hacking a bug with a plugin” solution.
Summary
Translating the logic and the structure of a Plone website to a WordPress-based site is not that straightforward. Even if you don’t have to deal with specific content types created by plugins such as Plomino of Ploneboard, you might want upload Links, Folders, News Items in a specific format other than a WordPress Post item. Also, Images are handled in a very different way in both content management systems, causing a couple of headaches too. This might be one big reason why there are no simple export/import add-ons between these two CMSes. Luckily enough with the web automation approach using software packages like Zennoposter (or Ubot Studio), you can build your own Plone to WordPress migration process. Should you need my scripts as a basis for that, don’t hesitate to drop me a line!
Six years ago, when we were pretty much in mass link building and link directory submissions, this script literally substituted a half-time employee, as it helped us to automatically check the presence of our links on various link directory sites. Although there are a couple of link checkers covering the use case when you know the specific URLs where to look for your links or an entire site is to be crawled in search of a link, but my directory link checker script does something different. You just have to enter the list of link directory domains where your links have been submitted and this script just tells you if those links have already been approved or not. This proved to be a very handy script for creating link building reports for our clients.
My very first web automation script
It took more than a week to write this script, and finally, when it was ready, It took again a week to re-write the whole thing from the ground up again. Way back then the challenge was that in many link directories you would never know the URL of the subpage where your submitted link showed up once it had been approved, so the only thing you could do is to check the mailboxes used for link building and go through the emails which were about submission approvals, plus open the sites and checking whether the links are already online – all of this made by hand. Obviously, gathering the list of successful submissions meant a lot of manual labour.
(The link submission process itself was already highly automated as we had been using a semi-automated link directory submission software, which meant a good compromise between speed and accuracy —as before submitting the links, we could choose the best category by hand, or enter appropriate data in a couple of directory-specific submission form fields.)
The logic of the link checking process
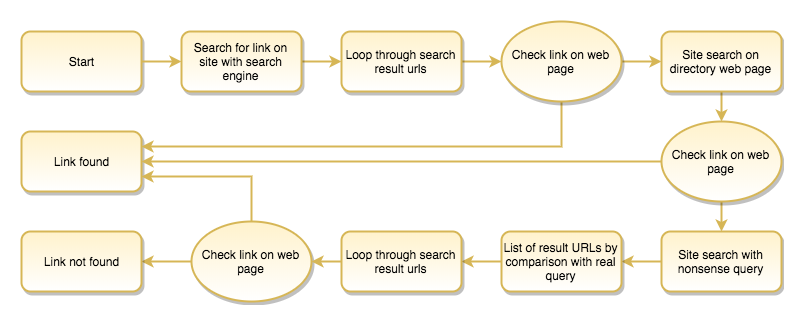
Using search engines to find the links
As the above, simplified diagram outlines, the script first scrapes the search engine search results restricted to the link directory domain, using search expressions like:
promoteddomain.com site:linkdirectorydomain.com
It crawls all the URLs listed as a result for these queries and if a link is found there, it logs the data of the successful link submission, loads the following link directory domain name and starts the process again.
Searching with the site search function of link directories
But if it fails to find traces of the submitted links with a web search engine (for instance Google or Bing), then it attempts to make a site search on the link directory page itself. As some directories are already linking the promoted domain from the search result page, the script might already succeed here. But if not, it starts to loop through the subpages listed as search results, loading each of these pages and checking the presence of the outgoing links pointing to the promoted domains.
Figuring out which internal links are search results
I could have created a database for each link directory, specifying the necessary parameters for doing a site search and evaluating it. Figuring out these parameters for each directory site, such as the search query URL schema and the regular expression to identify which internal URLs are search results on a site search result page. In this case the script could quickly and efficiently check the presence of links in the already known link directories, but the problem was that we had been constantly adding a lot of new directories to our database, plus as we had been doing link building in many different languages, it would have meant a lot of extra work to create and maintain such a database of parameters for thousands of link directories.
Therefore, I opted for a slower, brute-force solution which meant at least one extra query: searching for something nonsense, random string (such as the date and time), which ensured that no search results were displayed for it. Comparing the internal links of this with the normal search result pages, the difference shows us which internal links are search results, and which are other navigational, e.g. header or footer links of the page template.
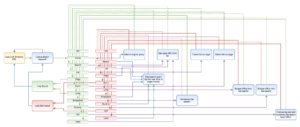
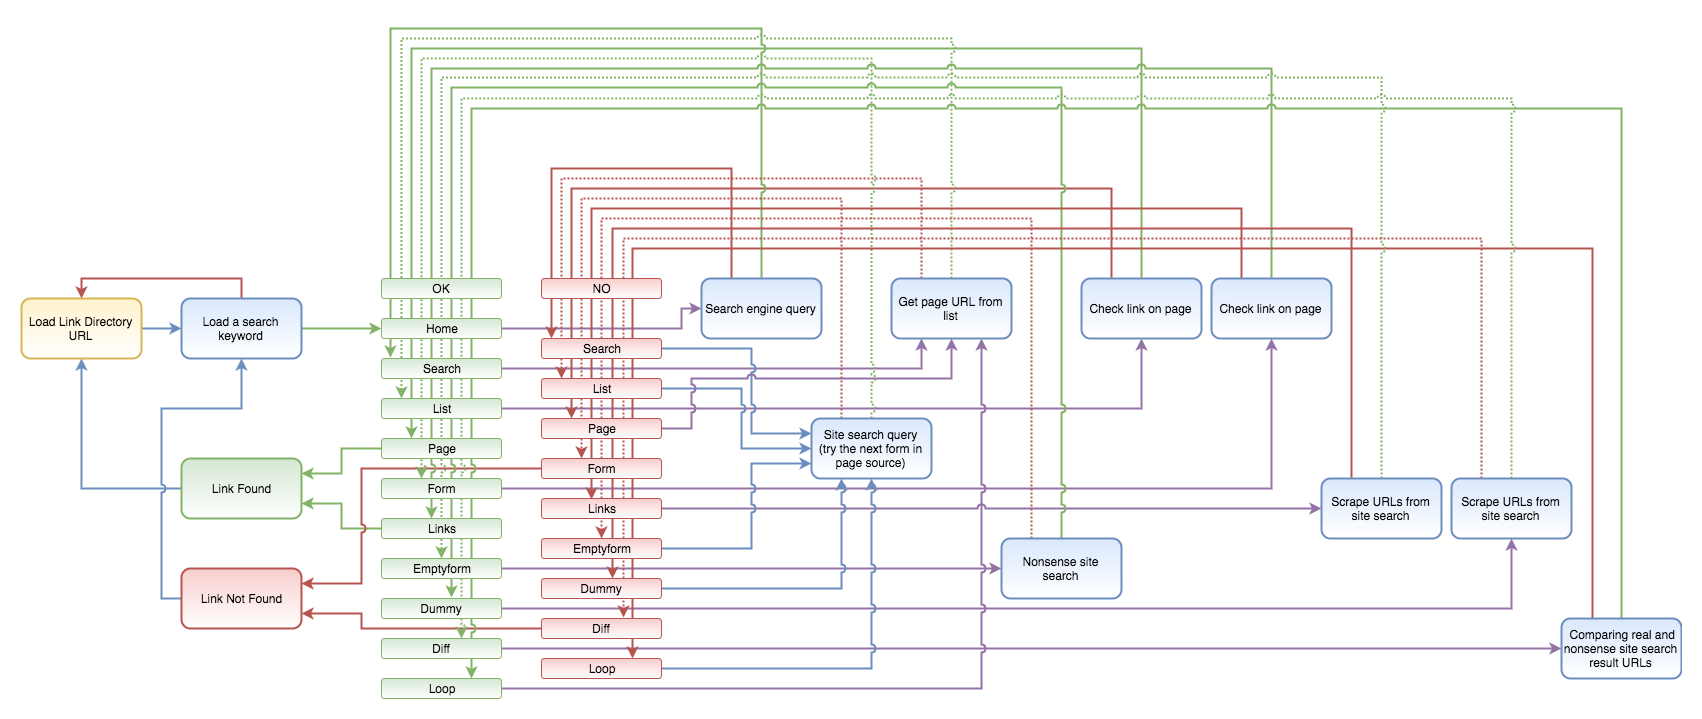
The detailed link checking process
The below process seems to be a lot more complicated than the previous one, but there are good reasons for it. Mostly because I wanted to include certain modules only once, and re-use them as much as possible so that later on I could easily add improvements to the process. Interacting with many different kinds of websites is always a tricky issue, something you have to constantly refine. For instance, your regular expression does a perfect job on hundreds of sites but eventually fails on a specific web page.
Identifying search forms
On the other hand, there is a second trick apart from figuring out the search result links, that is how to find out which form is a search form, and what should be done to submit that search query? Here again, I opted for the brute-force solution: the script enumerates all the forms on the link directory home page and tries to submit these forms using search queries like the promoteddomainname.com or {specific keyword combinations used in link submission texts}. If upon submitting the first form, there will be no results —just because the submitted link is not yet listed in the directory— it attempts to submit the second form, even if it is a login form.
Attempting to submit forms
Similarly, if the submit button can be easily found, the script attempts to submit the form by either clicking on other elements where chances are high that it could submit the search form with or emulating the keystroke of the enter button while the cursor is in the search field, etc.
Loops
As you can see, there are a lot of loops in this process given the brute-force nature of the script. First, it loads the link directory to work with, then it loops through the search keywords you will use to find traces of your submitted links (at least there should be two expressions: the promoted domain name itself and a specific brand or a very specific keyword combination you have included in any link submission text you have spun —something to take into consideration as early as setting up your link submission project.)
Controls
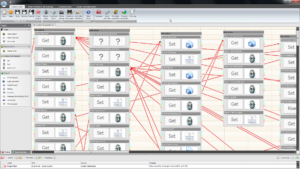
There are subsequent steps like home, search, list (not always a meaningful nomenclature, but nevermind). In every step, a different module is called. If the module exits with success then it returns to the OK branch, if not, then to the NO branch. Depending on the value of the step variable, these two branches point to different modules, that is if it could not succeed with one search method then it goes on to try another one.
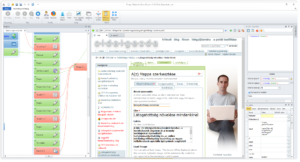
If you already know ZennoPoster and/or find some of the solutions quite odd: Well, the script was originally written with ZennoPoster 3 way back in 2012, but soon afterwards an entirely rewritten ZennoPoster was brought to the market, with a lot of new concepts and many advancements in debugging, therefore I had to rewrite the entire script, but I just wanted to keep the changes to the minimum, like using lists instead of files or using switch boxes instead of a series of if boxes: as you can observe in the below screen capture which shows the imported Zenno3 script along with the recently rewritten one.
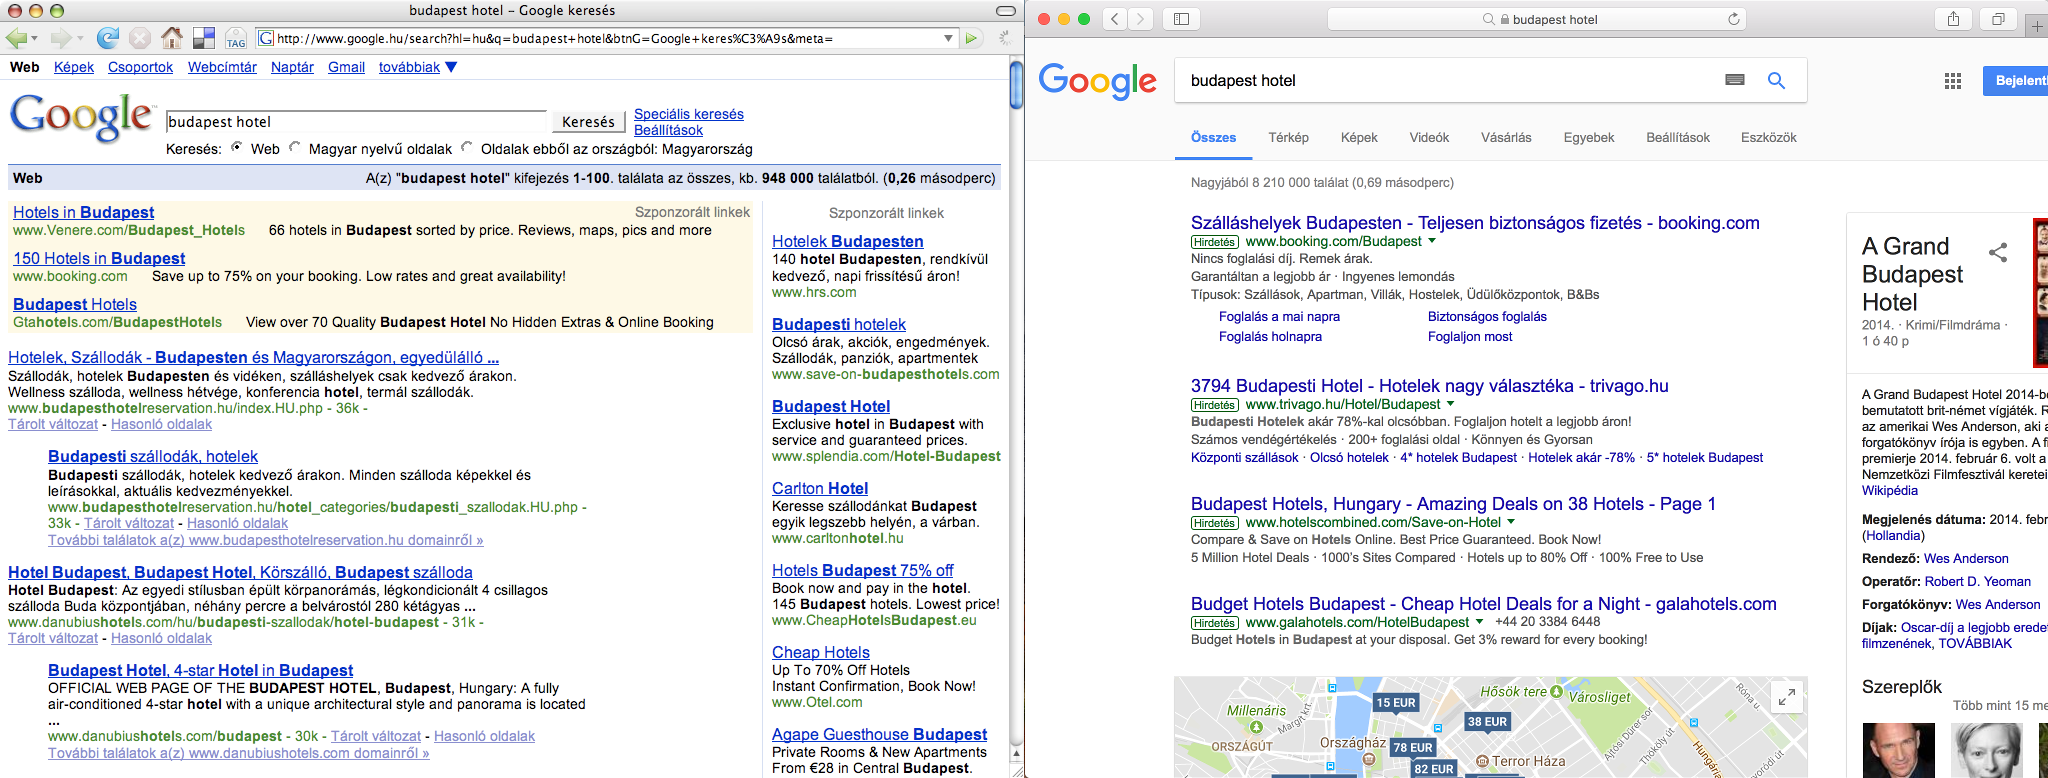
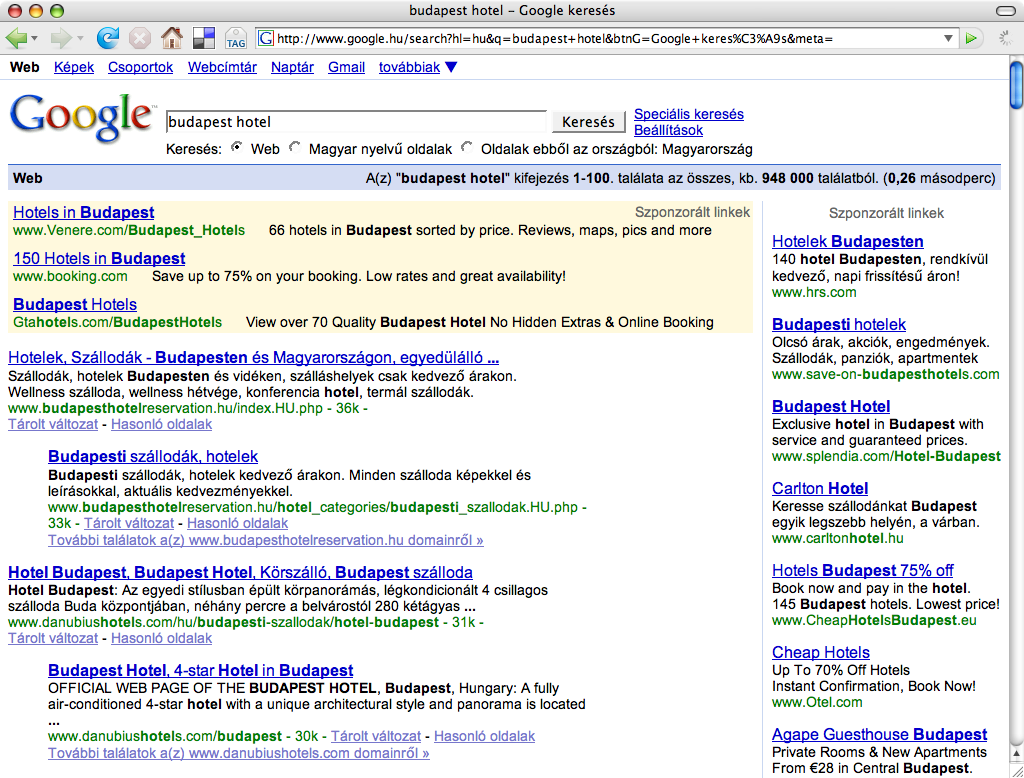
I have just come across an old screenshot of a Google result page while tidying up my files, and I just could not resist comparing it to a contemporary one. Wow, those were the times when you had at least a chance to get on the screen with SEO for popular keywords!
These two screenshots showing the results for the very lucrative keyword combination: ”hotel budapest”, albeit in Hungarian, clearly illustrate how Google’s search engine evolved over the years. While you might spot first some web design related changes, it is more interesting to look behind the surface and discover the substantial changes and tendencies which have a great impact on our daily online marketing activities.
No organic results above the fold
While the old screenshot shows four non-paid search results, occupying almost the half of the screen real estate devoted to displaying results, the more recent screen capture has no ordinary search results above the fold, not even on bigger screens with full HD resolutions.
During those good old days, if you were clever enough, you could get a considerable exposure in Google search results, while nowadays you have to rather rely on paid online campaigns, just because otherwise you cannot bring your message before the eyes of your audience on the most popular web pages. On the above screenshot, you can observe how the paid results, a knowledge panel on the side, and the map-based hotel search interface push down the first organic search results way below the fold. Meanwhile, in the old screenshot below, you can spot non-paid result snippets of an old-school hotel booking/aggregating site and a website of a local hotel aptly named “Hotel Budapest”.
By the way, these webmasters of these first-generation hotel listing/booking pages were among the first ones who were actively doing SEO in Hungary. These sites had been optimized quite frequently by the owner of the property, heavily relying on automated mass link exchange schemes and other, now obsolete, if not counterproductive techniques. They had been wiped out a couple of years ago by a Google algorithm update, way before booking.com and Airbnb started new chapters in the history of online booking.
Google wants to keep users in its walled garden
Although Google’s robots still do not create content, the tendency is clear, just as it was obvious ten years ago too: more and more web content is to be scraped, processed and displayed in a structured format on Google’s own web pages, thus more and more answers are given on the search result pages itself, therefore the content creators are rewarded with fewer and fewer clickthroughs by Google.
You can observe how the hotel offers are listed on a map, how the different prices from the booking portals and the hotel web pages are blended in search results, and how the whole thing is enriched by user reviews and other additional information hosted by the Google My Business service.
It can be easily seen that this ”movement” provides a more seamless experience for the search engine users but also means a lot of drawbacks for the webmasters aiming for getting organic, that is, free traffic from one of the most popular websites of our time.
Conclusion
As big online platforms, such as Google and Facebook, are trying to increase their revenue year by year, less and less free slots are to be available for webmasters, and more and more is to be paid if someone wants to get traffic from these huge sites.
The other phenomenon related also to the constant need of generating more profit is that these online platforms are increasingly capturing others’ content, incorporating them into their services, that is, instead of conveying traffic to the content sources, they will try everything to keep their users close to their ad placements while they consume the third-party contents.
Some more tidbits
It’s also funny to see that while a couple of years ago there was only 948 000 results reported, nowadays there are approximately 8 210 000 results estimated – almost ten times more.
This might be the reason for a ”slower” result generation time: instead of 0,26 seconds, it took almost three times longer, a whopping 0,69 seconds. 🙂
The new results page just does not fit on a 1024 pixel wide screen anymore — a screen resolution commonly used by web designers as the minimum width ten years ago.
The knowledge panel providing in-depth information about a movie titled ”The Grand Budapest Hotel” among the contemporary results indicates that Google is not quite sure about your search intent when you just type ”budapest hotel”. If the big G is not sure what you are looking for, then there might be a considerable amount of search volume for the movie too — in comparison to the volume of the ordinary hotel searches.
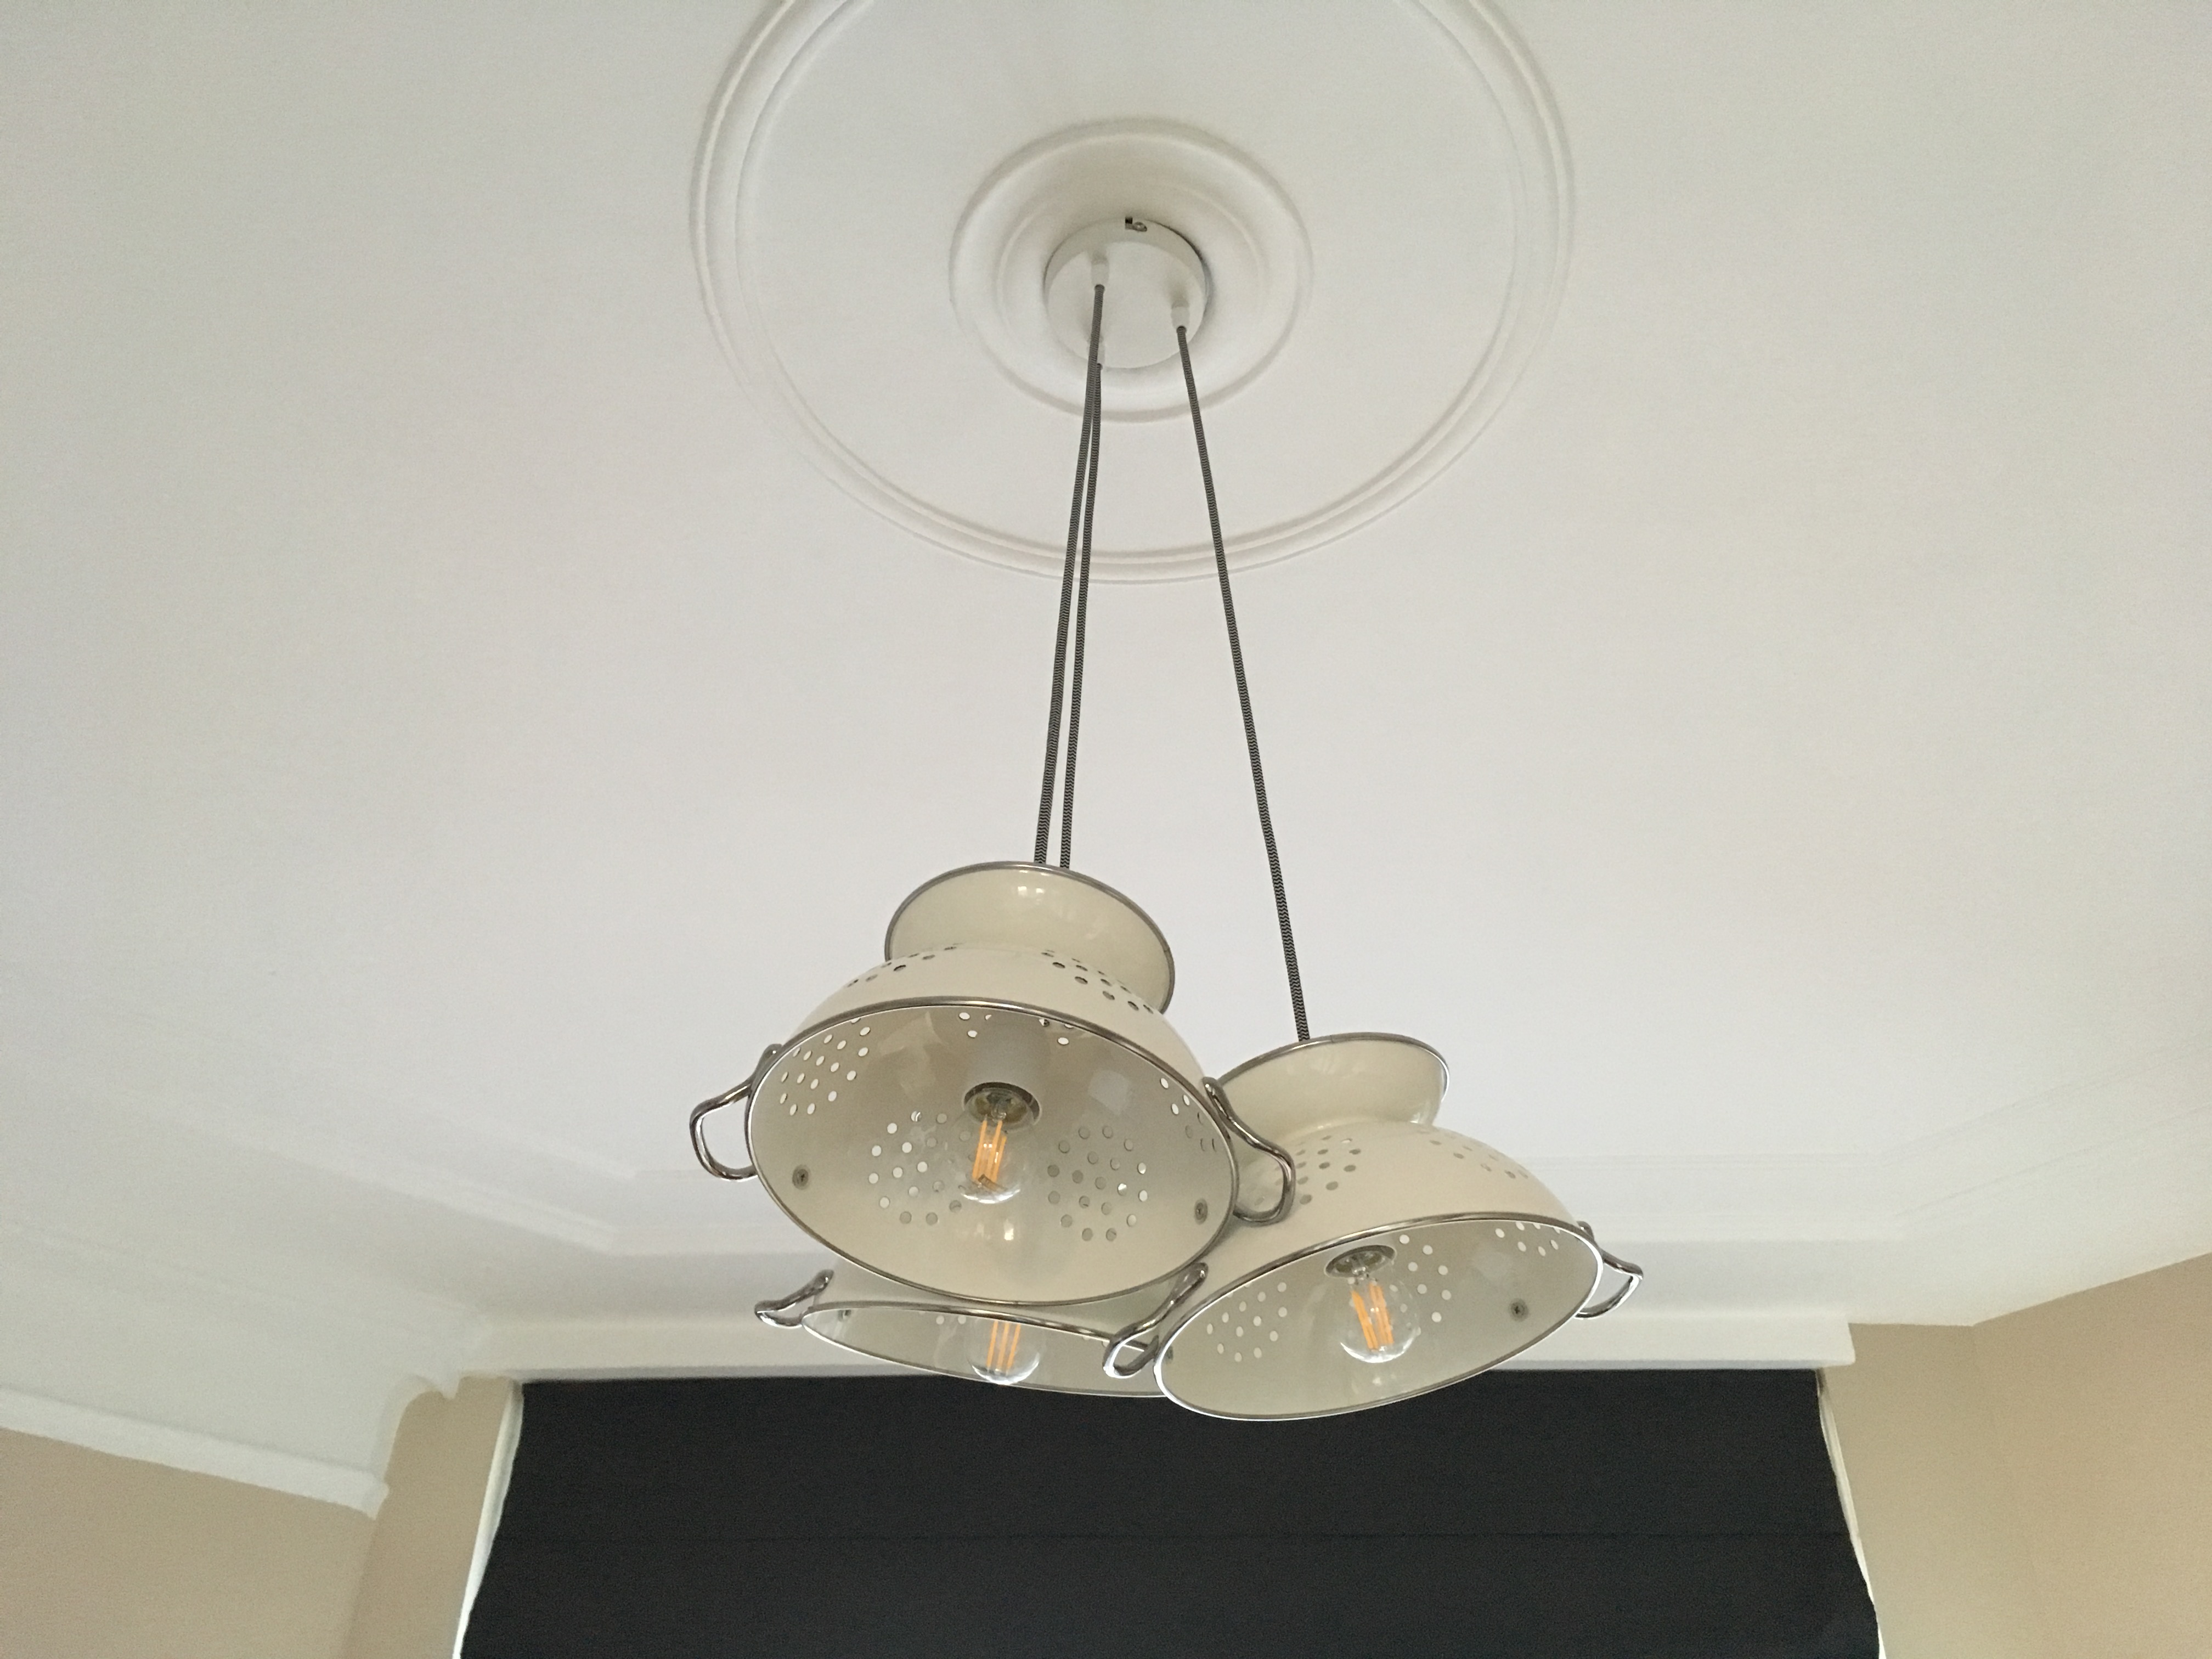
As nowadays you can buy so many different types of LED filament bulbs and all sorts of chord sets for pendant lamps, there is quite a big temptation for the DIY-minded folks to hang their own designs instead of buying a ready-made piece of pendant light or chandelier. At least, I could not resist, so I ended up creating lamps with non-conventional lampshades too.
Take one — Just chords and bulbs
First, I have just bought a triple chord set and three 400lm LED filament bulbs. As we needed a quick solution, I have just started to play around with weaving the chords. Better than nothing, but I guess I will eventually change this for something slightly more sophisticated. While you don’t need to have a lampshade for this kind of bulbs, 1200 lumens aren’t too much for a bigger room like ours.
Take two — Non-conventional lamp shade
Next time I’ve just got a couple of vintage-looking colanders from IKEA and all the other stuff from a local DIY store. All I had to do is to drill a bigger hole in the colanders for the fittings; plus cut and connect the cables. First I opted for conventional size 1000lm filament LED light bulbs, but these were just too bright and glaring, so I replaced them with three 400lm bulbs – of the smallest size you could buy.
Take three – Abstract lampshade
Thinking about the next lamp I needed to install I was quite sure that I would use the surplus dry cleaner wire hangers we accumulated during the last couple of years, so I started to tinker with them. As it was intended for our low-ceiling bedchamber, I just needed something small and simple with just a single light bulb, so I just bought an IKEA Hemma cord set, a big Lunnom bulb again, and started to sculpture something out of my wire hangers, fixing them with small wires which were sold with dustbin bags. Although it ended up as a rather abstract –from some perspectives quite chaotic– wireframe lampshade, it projects quite interesting shadows onto the ceiling.
Some more photos
I hope, these photos will give you some inspiration to build your own lamps one day. 🙂
LinkedIn is a really cool platform when it comes to job search—or looking for your next step in your career, whatever. But what can you do when the site lacks a couple of vital features, and therefore it just wastes your time unnecessarily? Plus, how can you make sure that you have seen all the potentially interesting job offers when there are a couple of hundreds of positions available in your region?
Reading through hundreds of job offers?
Yes, I might be in a unique situation, where many circumstances just do not matter that much, so perhaps I keep more on my radar and browse through more adverts than an ordinary—or a casual job hunter. And this is where my problem is rooted: it is just too cumbersome to regularly check new job adverts on LinkedIn. Imagine that you have to enter many keywords one by one, then enter the location, set the desired distance radius, sort them by the date and start scrolling through the list, click each job offer which might seem interesting—judged by the search result page excerpt. Usually, you end up checking many ads you have already seen, again and again.
Save button for Job offers is just not enough
The whole process could be much easier with a simple feature like a button next to the Save/Unsave button with the text ”That’s not for me” or simply “Hide”. Luckily, I can quickly write a script with a web automation software to implement some of the missing functions of LinkedIN—or any other web site. However, the vast majority of ZennoPoster or Ubot Studio users are using these pieces of software to build bots which scrape a considerable amount of information from LinkedIn (something that LinkedIn hates and tries to prevent as much as possible), but you can use these tools for legitimate purposes too: to hack together something which provides you with the missing features.
It will not work with Ubot Studio alone
Ubot Studio has a nice feature I needed. It allows you to combine a web browser window with an additional user interface for data input, therefore I had initially started to implement this simple script in Ubot. Unfortunately, again I found some very basic obstacles which prevented me from building anything usable. <rant begins> To be honest, Ubot is just the least stable piece of software I have ever seen. If you take into consideration its price too, I think Ubot could be nominated for the title of the most time and money wasting application ever. I have already wasted so much time because of its frequent crashes, inability to deal with certain types of websites, unpredictable behavior, etc., that I always regret when I pay for an upgrade again. As I mentioned there are only two features why I still keep on struggling with this tool: the additional user interface and the ability to easily compile standalone .exe files for the bots. All in all, if I logged in to LinkedIN, Ubot just could not detect anything on the web page loaded, and tech support had no solution for that either — which is a shame and gives me the feeling that something is just screwed up with this tool from the ground up. <rant ends>
Let’s write two scripts then!
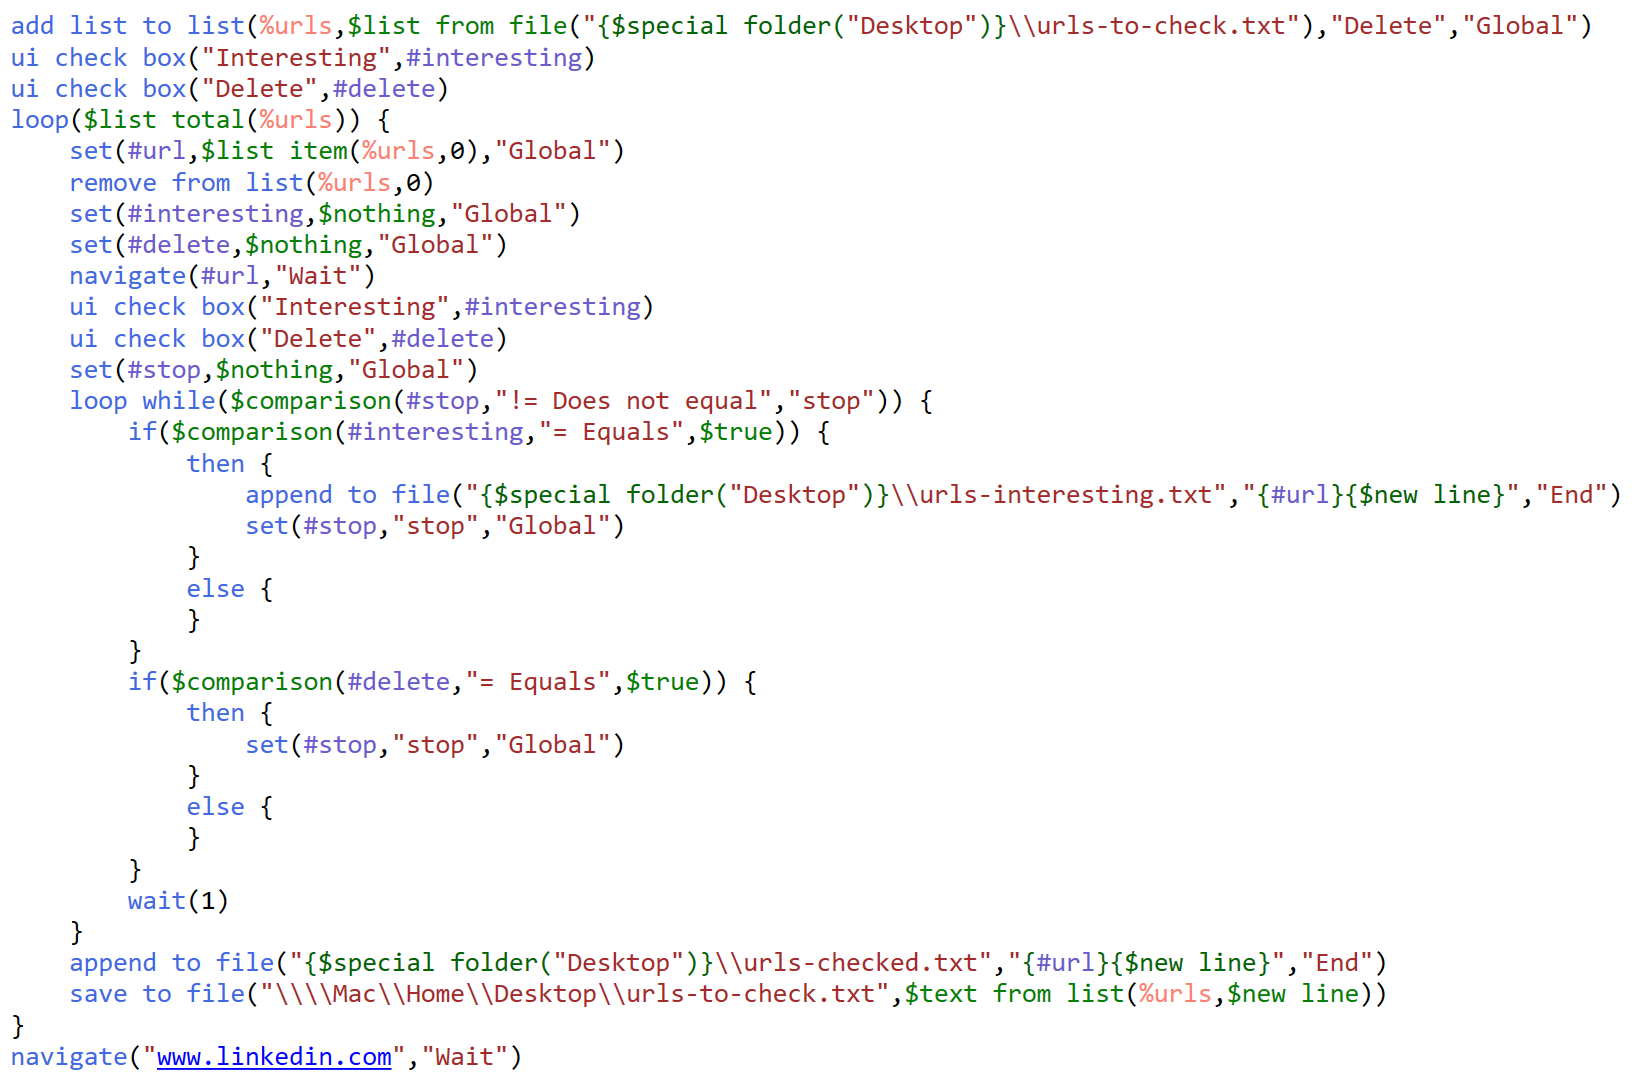
This is why I fired up ZennoPoster, and put together a simple script—without any problems. It logs in to my LinkedIN profile, sets the location and enters the keywords for job search, like online marketing, digital marketing, social media, google, facebook, adwords, seo, hongarije, hongaars, archicad, spanish, hungarian, hungary, marketing, marketeer, etc. Then it goes through the search results list by clicking on the pagination links, and scrapes all the job advert links to a plain text list ensuring that the link is not already listed among those which have been checked previously. It also checks the presence of the keywords on the exclusion list, such as recruit, stage, stagiair, intern, php(\ |-), javascript, frontend, backend, front-end, back-end, webdeveloper, \.net\, etc. and omit these job offers obviously not made for me.
Step #2 – back to Ubot Studio!
Now, I have a URL list of all the job offers which have certain chance to be promising for me. The next step is to read through them as quickly as possible—we are talking about hundreds of job offers. Sometimes there are many false positives: for instance, if a recruiter company includes phrases like ”visit our Facebook page”, in each of their job descriptions, then the fact that I am looking for Facebook-related jobs with the ”facebook” keyword just makes everything much more difficult. In addition to that, I could find a couple of interesting job offers which did not match any of the specific keywords like ”online marketing”, only the very generic ones like ”marketing”.
I have already had similar, very simple bots written in Ubot for going through a long list of URLs to add feedback to every loaded web page and save back the URLs with the manually added data. (Think about quickly tagging or writing titles for hundreds of products in a web shop while understanding what those products are really about.) So I just quickly modified an older script. It just loads one job offer page, waits until I click an appropriate check box: either ”Interesting” or ”Delete, and then it automatically loads the next web page while administering the process by adding the URL to the list of URLs already checked plus to the list of interesting job adverts if I clicked the corresponding box. With this method I could so quickly go through hundreds of job offers that once LinkedIn thought I am a bot (as I was logged in, since I also wanted to save some of the interesting jobs), and practically did not let me do anything without solving those silly captchas again about cars, roads and road signs, so I had to give up using LinkedIn for a day or so.
For someone who cannot just that quickly write web automation scripts, it might not have been worth setting up an automation hack for this case, but for me, I think it was worth it. On one hand, I guess the fact that I don’t speak Dutch (yet) will make my job hunting a little bit longer than the average, so it will save a lot of time for me. On the other hand by reading through so many job descriptions, now I have a better understanding of what kind of jobs are available in The Hage area.
In this article I will show you how to migrate a site created with an old, and nowadays deprecated content management system to a contemporary CMS, using web automation tools – that is grabbing a site’s content by walking through it with bots imitating human visitors, and uploading it to the new site similarly, by acting just like a human editor.
More than a decade ago I started to build a very successful website with a simple yet powerful Zope-based Wiki engine called Zwiki. As both Wikis (with the one notable exception of Wikipedia) and Zope usage has been in decline for many years, I haven’t actively developed that site anymore, but as I did not want to lose its content, I decided to migrate it to WordPress.
Step #1: Scraping a Zwiki site
Getting structured content from a wiki
When moving a site, the first challenge is to download the website’s content in a structured format. As we are talking about a wiki-type site, there is a strong emphasis on the word: structured, as the basic philosophy of the wikis consists of adding content to one single page body field, and using certain kind of formatting notations inside of that one big content field to display the information in a format which resembles some structure. Zwiki, for instance, has a handy function which allows commenting and following others’ comment on any wiki page, but all the comments are to be added to the very same field where the actual page content is stored, therefore I had to find in the pages’ text where each comment begins, and store them separately from the content.
Dealing with the special content markup
Yet another challenge was that Zwiki, just as many of its counterparts, uses a specific, simpler-than-HTML kind of markup code, which cannot be recognised by any contemporary content management system, so I could not rely on the content I could get by opening all the pages for editing, so I had to scrape the public web pages, where the special markup is already interpreted and translated to ordinary HTML.
Imitating human visitors with web automation tools
As I have experience working with a few web scraping/web automation software my obvious choice was to scrape the Zwiki site as if a human visitor would click through each and every link on the page and download its content. This way you are not limited by the export/import formats a certain CMS would offer when it comes to acquiring and uploading content, but you can get whatever part of the content you want, and process them with whatever regular expressions you want and log the results in any format. If a human visitor can walk through the entire site, you can grab all the information.
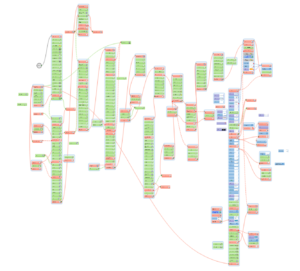
The logic behind the scraper script
Wiki-based content management systems tend to have a feature which greatly simplifies the content scraping process: they usually have a wiki contents page where all the pages of the wiki are listed. Therefore it seemed to be a very easy task to get all the content I needed to move: just open the contents page, scrape all the links, go through the list of them and visit, download and post-process each one. As an output, I have generated a .csv file where the page hierarchy, that is all the parent pages has been logged, another .csv file where the actual content of each page has been logged with a few pieces of key information such as title, URL or last modified date. This last piece of information could be obtained by visiting each wiki page’s history sub page and reading the dates of previous changes listed there. The third file had every comment in a separate row, extracted by regular expressions from the page content. I have also generated another file with the raw content for debugging purposes. It records the page content plus the comments in their original format so that if something went wrong with the processing of the comments, the original source could be at hand.
Putting it all together with UBot Studio
As the whole process didn’t seem to be too difficult, I opted for using Ubot Studio for downloading and structuring the site’s content. It is marketed as an automation tool for internet marketers, but to be honest its main purpose was once to scrape and spam websites by link submissions, comments, etc. But nevertheless it can be used for various web automation purposes, and one of its key function that the Bots I create can be compiled in a .exe format, which can be run on any Windows computer, without having to buy the software itself. I would not publish this executable as I don’t want anyone to play around with scraping Zwiki sites, thus putting an unnecessary load on their servers, but feel free to contact me by commenting this page or dropping me a mail (kedves /at/ oldalgazda /dot/ hu) if you need that .exe file to migrate your Zwiki site as well.
Another interesting feature of Ubot is that although its primary interface is a visual programming UI, you can still switch to code view, where you can edit the script as if it was coded in an ”ordinary” programming language. The Zwiki scraper script, for instance, looks like this below in code view. If you have some patience, you can go through the script and understand what each step did, and see which regular expressions I used when structuring the data:
 ui text box("Domain to scrape (without http(s)://):",#domain)
 allow javascript("No")
 navigate("{#domain}/FrontPage/contents","Wait")
 wait for browser event("Everything Loaded","")
 wait(5)
 set(#scraped,$scrape attribute(<class="formcontent">,"innerhtml"),"Global")
 add list to list(%pageurls,$find regular expression(#scraped,"(?<=href=\")[^\"]+"),"Delete","Global")
 loop($list total(%pageurls)) {
     set(#pageurl,$list item(%pageurls,1),"Global")
     navigate(#pageurl,"Wait")
     wait for browser event("Everything Loaded","")
     wait(5)
     set(#content,$scrape attribute(<class="content">,"innerhtml"),"Global")
     set(#content,$replace regular expression(#content,"<a\\ class=\"new\\ .+?(?=</a>)</a>","<!-- no wikipage yet -->"),"Global")
     set(#content,$replace(#content,$new line,$nothing),"Global")
     set(#content,$replace regular expression(#content,"\\t"," "),"Global")
     set(#contentonly,$replace regular expression(#content,"<p><div\\ class=\"subtopics\"><a\\ name=\"subtopics\">.+",$nothing),"Global")
     set(#contentonly,$replace regular expression(#contentonly,"<p><a name=\"comments\">.+",$nothing),"Global")
     set(#contentonly,$replace regular expression(#contentonly,"<a name=\"bottom\">.+",$nothing),"Global")
     add list to list(%parents,$scrape attribute(<class="outline expandable">,"innertext"),"Delete","Global")
     set(#parentlist,$list item(%parents,0),"Global")
     clear list(%parents)
     add list to list(%parents,$list from text(#parentlist,$new line),"Delete","Global")
     set(#parentlist,$replace(#parentlist,$new line,";"),"Global")
     set(#posttitle,$list item(%parents,$eval($subtract($list total(%parents),1))),"Global")
     set(#posttitle,$replace(#posttitle," ...",$nothing),"Global")
     if($comparison($list total(%parents),"> Greater than",1)) {
         then {
             set(#parent,$list item(%parents,$eval($subtract($list total(%parents),2))),"Global")
         }
         else {
             set(#parent,$nothing,"Global")
         }
     }
     append to file("{$special folder("Desktop")}\\{#domain}-page-hierarchy.csv","{#pageurl}    {#posttitle}    {#parent}    {#parentlist}    {$new line}","End")
     clear list(%parents)
     add list to list(%comments,$find regular expression(#content,"<p><a[^>]+name=\"msg.+?(?=<p><a[^>]+name=\"msg.+)"),"Delete","Global")
     loop($list total(%comments)) {
         set(#comment,$list item(%comments,0),"Global")
         set(#date,$find regular expression(#comment,"(?<=name=\"msg)[^@]+"),"Global")
         set(#title,$find regular expression(#comment,"(?<=<b>).+?(?=</b>\\ --)"),"Global")
         set(#title,$replace regular expression(#title,"<[^>]+>",$nothing),"Global")
         set(#author,$find regular expression(#comment,"(?<=</b>\\ --).+?(?=<a\\ href=\"{#pageurl})"),"Global")
         set(#author,$replace regular expression(#author,"<[^>]+>",$nothing),"Global")
         set(#author,$replace regular expression(#author,",\\ *$",$nothing),"Global")
         set(#comment,$find regular expression(#comment,"(?<=<br(|\\ /)>).+"),"Global")
         set(#comment,"<p>{#comment}","Global")
         set(#comment,$replace regular expression(#comment,"\\t"," "),"Global")
         append to file("{$special folder("Desktop")}\\{#domain}-page-comments.csv","    {#pageurl}    {#date}    {#title}    {#author}    {#comment}    {$new line}","End")
         remove from list(%comments,0)
     }
     navigate("{#pageurl}/history","Wait")
     wait for browser event("Everything Loaded","")
     wait(5)
     scrape table(<outerhtml=w"<table>*">,&edithistory)
     set(#lastedited,$table cell(&edithistory,0,4),"Global")
     clear table(&edithistory)
     append to file("{$special folder("Desktop")}\\{#domain}-page-content-raw.csv","{#pageurl}    {#lastedited}    {#content}    {$new line}","End")
     append to file("{$special folder("Desktop")}\\{#domain}-page-content-only.csv","{#pageurl}    {#posttitle}    {#lastedited}    {#contentonly}    {$new line}","End")
     remove from list(%pageurls,0)
 }
Step #2 Uploading the content to WordPress
Now that I have all the necessary data downloaded to .csv files in a structured format, I needed to create other scripts to upload the content to a WordPress site. Here I opted for the same technique, that is imitating a human visitor, which hits the ”Create a new page” button each and every time, and fills all the edit fields with the data grabbed from the downloaded .csv files. More details about this part can be read here: From Plone to WordPress — Migrating a site with web automation tools
I had spent so much time searching for the perfect WordPress theme on ThemeForest, but as I haven’t found one which would 100% reflect what I think about modern websites nowadays, I decided to create my own ultra-minimalist, mobile-first theme and made it available for free.
Why have I created my own WP Theme?
Although the previous WordPress theme I had been using at oldalgazda.hu was quite OK, somehow I didn’t like it 100%, just could not feel that it was ”my way” of building a web site. As oldalgazda.hu have been lately only a hobby project, it was crucial that the site I am tinkering with has a web design I really like, and nevertheless, it is simple enough that I could easily alter it and further develop however I feel like.
During recent years I have come across quite a few innovative and interesting WordPress themes such as Mila or Evolutive, but my biggest problem with these and similar themes that they are just too image-centric: should I eliminate images from the demo content, they just become way less impressive. On the other hand this article about website obesity had a great influence on me, so no matter how I really appreciate JavaScript stuff like Masonry, Isotope, etc., this time I wanted to create something really minimalist for myself: A kind of theme which only adds the absolutely, inevitably necessary amount of code to the actual content, so that I could concentrate on what really matters: the content itself.
What is the essence of my Sixpack WordPress Theme?
Ultra-minimalist: As the name indicates, the basic principle of this theme is that there cannot be more than six content items visible on the screen – for the sake of clarity and readability. Of course, more content items can be accessed by scrolling down the page, but the basic rule applies there too: no more than „six packs” of content should be displayed on the screen at the same time.
Tile-based: The content items are displayed as tiles. I think Windows’ Metro interface was a great innovation, as only the tiles can provide a consistent appearance independently of screen size.
Mobile-first: While developing this on a desktop computer, I was always thinking about how this or that would look on a smaller screen, so when I finished testing the basic stuff on bigger screens, I just needed a handful of special CSS rules for small screens: mostly for decreasing the number of the simultaneously displayed content items from 6 to 2-3-4.
Forcing you to publish the right way: The theme will look at its best if every entry has a short introduction and a featured image, something you will eventually need when you post it anywhere else. Posts and Pages are treated in a very similar way, almost identically listed everywhere (except that for Posts rather categories are shown and for Pages, the page hierarchy is displayed). Instead of defining a header image or a logo for the entire site, you can use sticky posts to display important stuff such as the title and goal of the site, its logo and perhaps a short description.
Made for a real site: This theme was made for my own purposes. It has been tested how it works with real content, not just with a bunch of stunning images just to create a nice demo site. I am also planning to develop it in the future to better serve my needs, so you can make sure the theme just works – or will work someday :).
What other features are worth mentioning?
No theme settings page: On one hand it is very comfortable for the average web site owner to have a visual dashboard where many parameters of a WordPress theme can be customised, but I find it rather perverted that the web server has to query and calculate with these parameters additionally whenever it is to display a web page. If we are about to change certain variables almost like once in a lifetime, then these values should be hard coded somewhere instead. All in all, go ahead and edit the template if you need to change something.
JavaScript-free theme: the theme itself does not load any javascript file, neither contains any embedded JS code. Of course, different plugins might inject their own code, but as far as my theme concerned, you can generate your web pages with only the absolutely necessary amount of HTML and CSS code.
No logo, header, sidebar, widget: I don’t like that ”let’s cram these not so important stuff into the footer, sidebar, perhaps one day it might be of someone’s interest” approach, I think it is just a waste of screen real estate, as nobody will read and act on these kinds of additional elements. This is the reason why I have omitted these standard WordPress features from my theme.
No navigation menus: in the era of social media sites, it is quite rare if we can make someone browse our web site and read more entries of ours during one website visit, as most of the visitors will just come for a certain piece of content they have seen on a social media or a search result page. This is the reason why I have not built in any conventional navigation menus.
Site search pushed back: partly because of the above fact, partly because WordPress search function out-of-the-box is just far from being useful, I did not feel the urge to place an omnipresent search element on each and every web page.
Contact us element on search result page: I think it is very important that if someone had searched but could not find the right content, we should give them a helping hand, that is providing an easy way of getting in touch with us to find a specific content: therefore you can easily ask for help in e-mail if you click on a special ”contact us” link, displayed on search result pages if there are no results or just a few of them.
Contact us element on 404 not found page: similarly, I think it is very important that the primary goal of these kinds of pages is not to give you an error message but to provide you with everything which could be useful in finding your way on the web site. This is why the 404 page is rather similar to the site map page, also including a shortcut to ask the website owner’s help in an e-mail.
Not a general-purpose theme: minimalism and simplification obviously also means a reduced feature set, but as I mentioned the main goal was to create something to serve my blogging needs, so you should add quite a few other visual elements to use this theme for a web shop or a forum.
Feel free to use it for any purpose, even for commercial purposes. The only thing I ask is to reference the author of this theme, so please link http://www.oldalgazda.hu at least somewhere.
I am thankful for comments, feedback, bug reports, suggestions for improvements.
You might have recently read quite a few articles summarising last year’s online marketing trends – but this article is not about summarising last year’s widely published and discussed news, but simply about what changes 2015 has brought to my professional life. Of course how someone sees this, heavily depends on what kind of marketing activities one pursues for clients and for own projects; therefore the below list will be neither objective nor definitive.
Facebook bigger than AdWords
While there are clients and there are certain kind of activities where it is still better to spend the vast majority of your budget on Google AdWords, but for me, 2015 was the first year when I was relying more on Facebook’s than Google’s advertising system. I have found myself spending my clients’ money more and more on Facebook and less and less on AdWords – even discontinuing advertising on Google Search for certain clients.
A few years ago AdWords was the one and only online ad system if you wanted to have a wide coverage and considerably grow your web site traffic by paid ads (I mean in Hungary and a handful of other markets outside the US), now it became just one – but still important – part of your marketing mix.
Facebook video bigger than YouTube
During the previous years, I just loved to advertise on YouTube with the TrueView video format: it was extremely cheap and fairly cost-effective. Last year it turned out that advertising with videos was even more effective on Facebook. I don’t mean here differences like the video autoplay function, but the fact that Facebook facilitates a way more intensive discussion related to the promoted videos. While on YouTube only a small fraction of viewers are commenting, on Facebook it turned out in many cases that prospects would frequently start meaningful, interesting, many times enthusiastic discussions as a consequence of video promotions.
Prospects asking their friend’s opinion, including their names in comments to notify them about a certain promoted content – isn’t this what many marketers would even die for? 🙂
A bigger mess to tidy up
AdWords, Facebook, plus add a few more contenders like LinkedIN, Instagram, Twitter – you will be quickly messing around with complex multi-channel online marketing campaigns, sometimes even for quite small clients with very straightforward business models. So things have been getting more complicated, so chances are getting higher that you’ll get lost somewhere.
This is the reason why I have been spending quite some time with properly naming my campaigns, remarketing lists, conversion points, events, etc. I had to set up sometimes quite a sophisticated naming conversions so that I could effectively work with many channels and many campaigns. And it was just one side effect of having to manage ad spendings on more online channels.
Google Tag Manager – a marketing dashboard
When defining complex marketing funnels with multiple steps and multiple channels, you will most likely end up with a quite complex Google Tag Manager setup – again with a well-thought-out naming convention system labelling the different tracking codes for the interactions you would like to measure along the entire online marketing funnel.
Therefore Google Tag Manager became one of the most important places where I can administer and overview the whole set up for complex online marketing activities – sometimes even incorporating additional logic a CMS system would never be able to handle. So far ”only” the results are missing from this interface.
Google Analytics just not enough
As an obvious consequence of our shift towards data-driven marketing, even the most sophisticated traditional web traffic analytics solutions seemed to be getting more and more obsolete, and lacking many People Analytics-related features of great importance. Even if I fed relevant data into Analytics to anonymously identify visitors, quickly found myself downloading a series of weekly data reports one by one so that I could get precise reports for a bigger time interval – instead of the heavily sampled ones, which proved to be a useless when I wanted to found a needle in the haystack.
On the other hand, the Google Analytics Premium is clearly a no-go for the majority of clients – both for its price tag and its missing features to easily identify individual leads’ activities.
Big Data bigger than Marketing
Having delved into Big Data and BI, in general, I got to a conclusion that while many principles and methods are indeed applicable to 99% of us online marketers, but for almost the same high percentage of us Big Data solutions are just an overkill – with a fairly big price tag.
I think just a small fraction of us would generate gigabytes of data per day with their marketing activities – so there should be a term like ”Medium-sized Data” coined for those online marketing professionals who would like to use complex systems to manage their data-driven marketing activities, without feeling forced to shell out a lot of money or hiring programmers for Big Data solutions that are eventually meant to handle huge data sets.
SEM more complex than SEO
At the beginning of this decade building up and running a complex system for my multilingual mass link building practice meant a much bigger intellectual challenge than I could ever imagine with paid search campaigns way back then. I think last year we got to the point where paid search and paid social media advertising together allowed us to create much more sophisticated processes and systems than the most complex search engine optimisation cases.
Managing various audiences – even beyond remarketing lists, see matching customers’ emails for instance – on multiple platforms proved to be more challenging for me than building links or content for getting better organic rankings.
Hosting is cheaper than ever
It might not be something last year brought to us, but I just realised it in 2015: I used to run the same virtual private server for more than nine years, just because I was too lazy to migrate all of the servers to a newer system or to an other VPS provider. But as the infrastructure of my old server was shut down without prior notice, I found myself forced to find an other hosting company – and ended up paying for the same service, four times less than before.
Other than that I could figure out how to host huge WordPress sites effectively on a bare minimum VPS setup. It was a long journey to find the best configuration, but the good news is that there is an almost-out-of-the-box solution for those who don’t want to pay the relatively high price of a managed WordPress hosting service but dare to mess around a little bit with Linux command line. WordPress is still not meant to host tens of thousands of posts, but you can find some workarounds to make that possible – without having to run it on a supercomputer.
…and a lot more
Of course last year I also started quite a few other new things – some of them will hopefully bear fruits this year, and some of them will define what and how I will work during this year. But one thing is for sure – we won’t be left being bored this year either…
Having read my previous post about how I found myself messing around with visual programming as an online marketer, you might have wondered: and what would be the everyday uses of those scripts when dealing with ad campaigns and web sites? Well, let me share some examples from the last few years I was working with these web automation tools to illustrate this:
Overcoming limitations of AdWords: finding more manual display network placements
Have you ever wondered whether AdWords will suggest you all the relevant display network placements, Youtube videos or Youtube playlists when you try to add them by entering relevant keywords? Well, the answer is that relying only on the ad management interface of AdWords, you will miss a lot of relevant placements. Fortunately, with some web automation skills, you can quickly build a script which finds even more relevant placements for instance by executing site searches on Youtube for a certain list of keywords, automatically pressing the next-next buttons and generating a simple list of URLs based on what has been displayed on the search result pages.
Analyzing your data the way you want: exporting external link data in a meaningful format
Although Google Webmaster Tools (a.k.a. Google Search Console) lets you browse through a huge list of web pages where a certain site of yours is linked, you cannot really export that data in a usable format, such as linking domain, linking web page, linked page in the same row. Although you could click through the list of linking domains, then the list of linking pages and export a bunch of tables based on this hierarchy, this sounds like a kind of repetitive task which can be fairly easily automated. Adding a few more steps like scraping the title of the linking page plus the anchor of the link, you can end up having a really informative list of your external links – at least of those which are displayed by Google.
Analyzing your data the way you want: obtain raw engagement data
While Facebook shows you some insights about how your pages or posts are performing, you cannot simply grab the raw data of these statistics: such as the number of visitors liked or shared certain posts in a given timeframe. But you can build a script which automatically scrolls and scrolls and scrolls – and extracts any data about the posts displayed. Having all the data in a spreadsheet format, you can visualize it the way you want. As a bonus: you can even do this with your competitors’ Facebook pages.
Automating repetitive tasks: checking link building results
Way back when we have been building tens of thousands of links on web directory sites, no link submission software could provide us with detailed and reliable data about which directories had accepted and published our link submissions and which had not. Without knowing how many links were eventually generated and where were those links located, we could not create detailed reports for our clients. On the other hand, the biggest problem of directory link building was that you never knew at the time of submission where the submitted link would be displayed in the directory, so the challenge was not only going through a list of URLs and see whether our link was found on those pages or not, but you had to look through the entire directory to figure out where exactly that link was. All in all, this task was more complicated than curl or wget a list of URLs and grep the results. Before I knew how to automate this process with visual scripting, we had to do this highly repetitive task by hand – so scripting could save us a lot of manual work.
Process spreadsheet data: check and merge what’s common in two tables
When you have to work with email lists and related data coming from different sources, you could quickly diff or merge two .csv files with Unix command line tools. But sometimes not everyone in your organization possesses those “geeky” skills to fire up awk for that, and many times you are also too lazy to find the best solution on StackOverflow. In these cases, with automation software, you can even create an .exe file with an easy to use interface where two files and a few more parameters are asked, such as which column’s data should be matched in the other spreadsheet to merge a table with the unified rows based on those matches – or whatever you can achieve with regular expressions, if / then statements and loops.
Extracting structured data from unstructured source: list of products in a website
Unfortunately, still there are many web shop owners who are running their sites based on proprietary webs hop management systems, which are not prepared for simply exporting the list of products from, or not in the appropriate format, with all the desired data, etc. In these cases, it is very handy if you can quickly build a script which scrapes the entire webs hop and outputs a spreadsheet of every product, containing all the important attributes and product data. Based on the result, you can start working on either the on-site SEO or importing those lists to Google AdWords of Facebook Ads.
Migrating web sites: exporting and importing from/to any CMS
There are quite a few ways of importing data into WordPress, but still, you might miss some features which can be normally accessed only if you upload the content manually, such as attaching images to a certain post or set the featured images. Not to mention that before that, you’ll have to get to the point of already having the data extracted from the old web site to a structured format such as XML and CSV. As many older CMSes and proprietary content management systems do not have such data exporting features, this part of the job could be also quite complicated, if not impossible. On the other hand, with some web automation skills you can extract any data in any format from the original site and imitate a human being filling out the corresponding data simply automating the new site’s administration interface – you don’t have to rely on any export-import plugin’s features – and shortcomings.
Web spamming: black hat SEO, fake Facebook accounts…
The tools I’m using for automating the above tasks are originally meant for creating accounts, posting content to a wide range of sites: thus spamming the entire web — but this is something I have never used these tools for – believe it or not 🙂
No matter whether you are planning to create a new landing page or an entire web site, these websites/collections might be useful sources of inspiration, showing the latest and greatest in web design and data visualization.
WordPress is a leading light in contemporary web design/web site building, and Themeforest provides the biggest collection of premium templates for it.
Since 2011, when I registered on this site, I have spent countless hours browsing its Wordpress theme collections, looking for nice stuff for both clients’ sites and for my own projects. …and sometimes just for the sake of seeing something new, nice and interesting. I must admit this is generally quite a conservative collection of web design ideas, as these templates were made for being sold to as many buyers as possible. This is the reason why the popular themes are many times adhering too much to a kind of standard taste, and this is why it takes some time to find really cutting edge designs or novel ideas among all of these ordinary themes. Some tips for finding the most inspiring designs faster at ThemeForest:
Start with the list of latest WordPress themes. The list of most popular themes might be interesting only if you are a newcomer, or not dealing with web development on a daily basis.
Restrict your searches with ”buzzwords”, that is keywords reflecting the latest trends and techniques, like masonry, isotope, megamenu, infograph, whatever. Keep in mind that as these words become mainstream, so they will become quite useless. Think about parallax (950 templates) or even the keyword: ”responsible” (more than 4000 templates).
Unfortunately, designers are generally concentrating on portfolio sites, fancy home pages, and one-page templates, so it is quite hard to find web designs with interesting ideas about organizing content and showcasing data. This is why whenever I open a template demo site, almost the first thing I do is to check out the Blog section and see what happens if the nice pictures included in the demo data set are not influencing that much the overall look and feel of the template.
If you have found a nice template, it’s usually worth checking out the other templates of the same developer too, they might have some more inspiring web design ideas showcased in their portfolio.
Some WP templates I really like
I discovered these templates a few years ago, and I think they have stood the test of time (and most importantly they are still sold at ThemeForest):
And finally an other minimalistic theme never sold on Themeforest – this is just an evidence of the fact that there can be found inspiring template designs outside ThemeForest too (although they are much harder to be found on the interweb):
… and many more jQuery plugins and functions to enrich your custom web designs or even create an entire landing page with. There are also a few better-known plugins gathered at this site, such as Isotope or Lettering.js, but the majority of the plugins are quite experimental – and therefore quite inspiring too.
Similarly to ThemeForest, Unheap also provides invaluable help with its easy-to-use interface to browse through the lists of many different plugins which have been gathered manually and listed in a uniform way. The demo links lead directly to the developers’ web page, and similarly to ThemeForest portfolios, it is also inspirational to browse through and see the other projects of these jQuery developers.
…or everything that is made with D3.js library, or made by Mike Bostock, a key developer of D3.js data visualization library, and also a former leader of complex data visualization projects and interactive storytelling articles at New York Times:
It is more about data visualization than web design, but for every web developer or online marketer who deals with visualizing information, the above examples can be very inspirational too. Not only when it is about building a web site but also when the data, we are working with, have to be presented in an outstandingly new way.
There might be a lot of other web sites showcasing the latest trends in mobile and web interactions. It’s sometimes just too hard to come across them, so I am quite sure that there are a ton of web sites out there I should be aware of.
It’s not so well known but there is a place where Google displays what it thinks about you – or at least what it is willing to tell you about it. If you think that Google knows everything, then you might want to visit this web page and check it out:
As for what Google has registered about me, the results were very-very poor: I had to uncheck 30 interests out of the 39 different interests Google has previously attributed to my Google Account. I must admit that as an online marketer perhaps I am not the easiest to profile since I am visiting a lot of different web pages, doing a wide variety of search queries, watching a lot of videos and ads, but still the original list was full of irrelevant interests like Dance & Electronic Music or TV Reality Shows or Billiards – topics I have never sought for.
As a frequent user of Google’s services like AdWords or Analytics, I tend to think that there are a whole lot of things Google knows about us statistically and builds many services upon that (such as conversion optimizer or similar audiences) without disclosing too much about its knowledge to us.
Perhaps I have overestimated Google’s ability to identify and categorize their users based on their activities? Once I was told by a Googler that cookie is the new keyword, but if there are so many irrelevant pieces of information attached to those cookies, there is still a long way to go.
My mother bought my first computer at times when everyone having a computer used to learn to code as well. Although I had been enthusiastic about both coding and playing with my Commodore +4, I was never able to see through many lines of code and not to make silly mistakes while transforming my ideas into Basic programming language. So I never got immersed to coding and didn’t become a programmer eventually.
Getting back to programming with web automation
Way back in 2012 when I was already doing all sorts of search engine marketing I started to code again. I was looking for effective tools to automate my mass link building tasks, and instead of sticking with yet another link submission software, I came across a wonderful generic web automation tool. It took me two weeks to write – and other two weeks to re-write – my first script which could do the tedious work of checking the status of our directory submissions one by one. I was just happy that this script was virtually replacing a half-time employee, and wasn’t really thinking about how important visual programming would become for me in the future.
Visual programming for online marketers
During that last three years, I had been spending more and more time with using these tools – originally built for web spamming. This experience has gradually transformed what I think about an online marketer could and should do when it comes to aggregating, processing and analyzing data – from the web, our own analytics or other internal data sources. Although I admit there are faster and more scalable ways of doing this, having a few easy-to-use software at hand makes me able to relatively quickly get insights from the data I’m working with or complete those tasks which have a highly repetitive nature – without being a programmer or employing one.