Category: Web Automation

As I have had quite a few, complex Plone sites, none of the proposed methods I found on the net would have been useful for me. Some of my sites had a complex subsystem built with Plomino – a kind of CMS in a CMS, while other sites had a forum or a multilingual structure, therefore I had to resort to fire up my beloved web automation tools and build my own scripts to export Plone content in a structured format and import it in my WordPress sites. This article will describe a unique method of exporting a Plone site with web scraping tools and importing it into a WordPress site – a process which could be adapted to practically any kind of CMSes and any type of website migrations.

Why is this method so unique?

I am imitating a human being during the whole migration process, that is visiting every web page or its editing interface and the site’s management interface to extract the necessary information.  Then, in the second step, the content is entered to the new site just like an ordinary web editor would do: by pushing the appropriate buttons, typing in the text and filling in other fields of a page/post edit screen. I am just speeding up the whole process by automating this process with my web automation tools. All in all, instead of querying databases, executing SQL commands, filtering and normalizing data, using import/export add-ons, I am dealing with the ordinary web interfaces of both the new and the old site during the whole migration process. The disadvantage of this process is that it is way slower, but its advantage is that you can do whatever you want.

Complexity of Plone and the export process

You might have read the logic behind how I had exported the whole content of a Zwiki-based site, but exporting all kind of content from a Plone site resulted in a much more difficult process. The main difference between a simple CMS – like Zwiki – and Plone is that the latter has various content types – both folder-like content types (that is a content which can contain other content elements) and document-like content types. And each of them has a bunch of special fields. Also listing every piece of content was not that easy either, as a Plone site does not have an extensive Table of Contents-like page where every content item is listed — unlike the wiki-based sites.

Step #1: Scraping the old Plone site

a.) getting a list of every content item

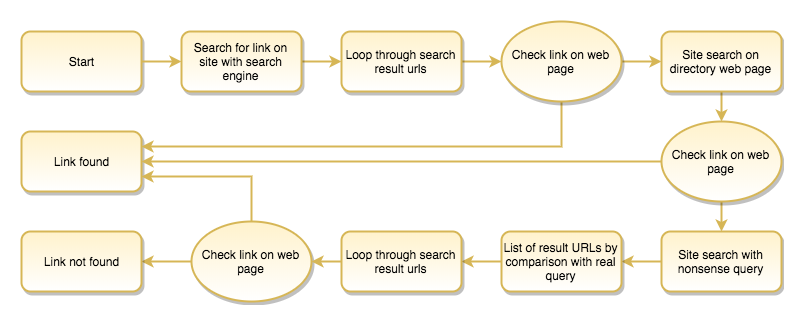
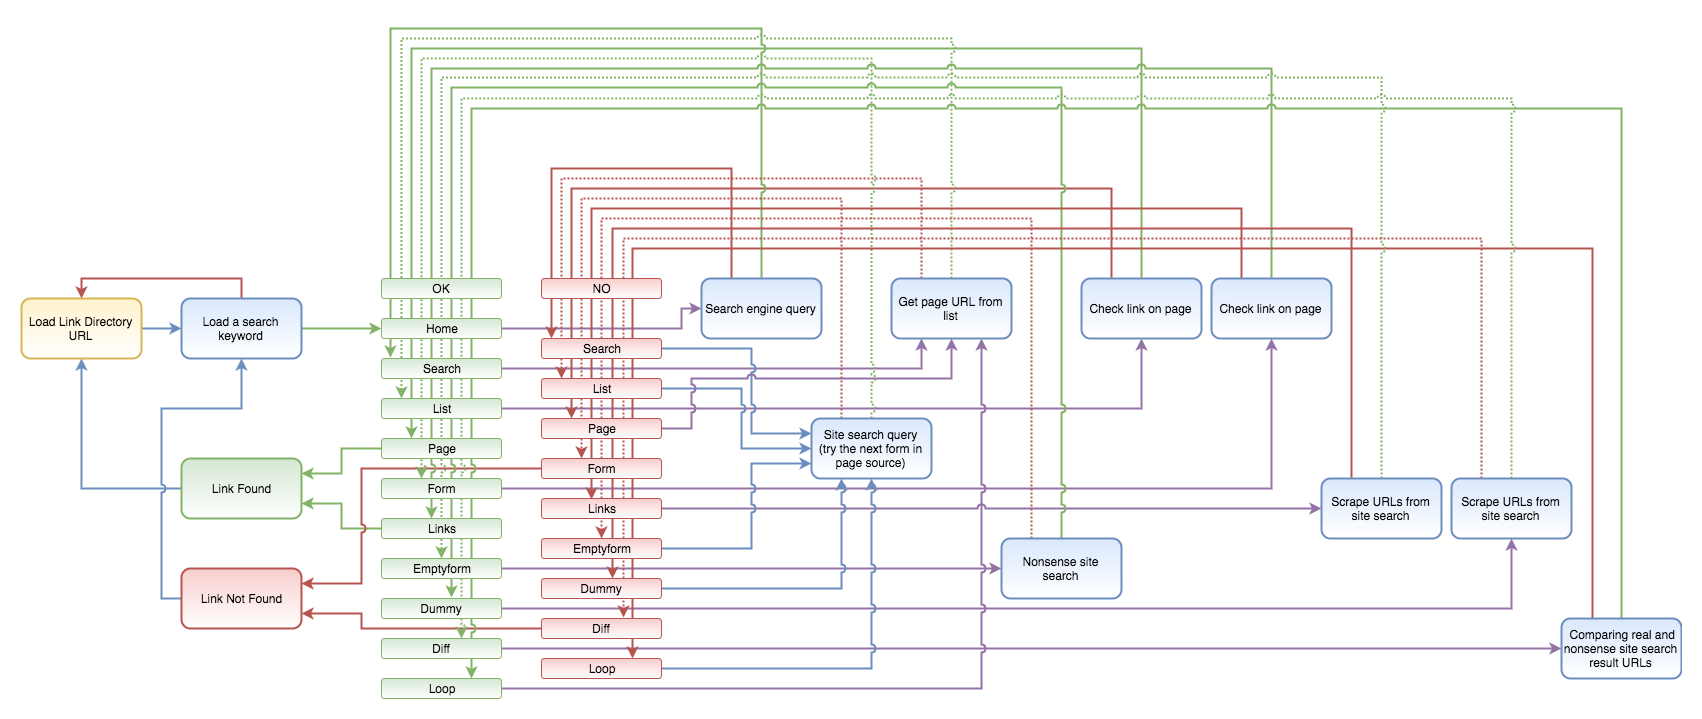
First I thought that I would create a script which could scrape every published content from the site without having an administrator access. In that case what my script should have done is to go to the advanced search form, check all available content types and run a search without a search keyword, then go through the result pages by keeping on pressing the next buttons. But I had to realize that there is a setting for each content type which controls whether that content type is searchable or not. Therefore, so as to get a full list of every content item, you should go to the settings page first and make every necessary content item searchable. Then I found out that the portal_catalog must have some bugs because I realized during the process that the advanced search was omitting a couple of content items – and I still could not figure out why.

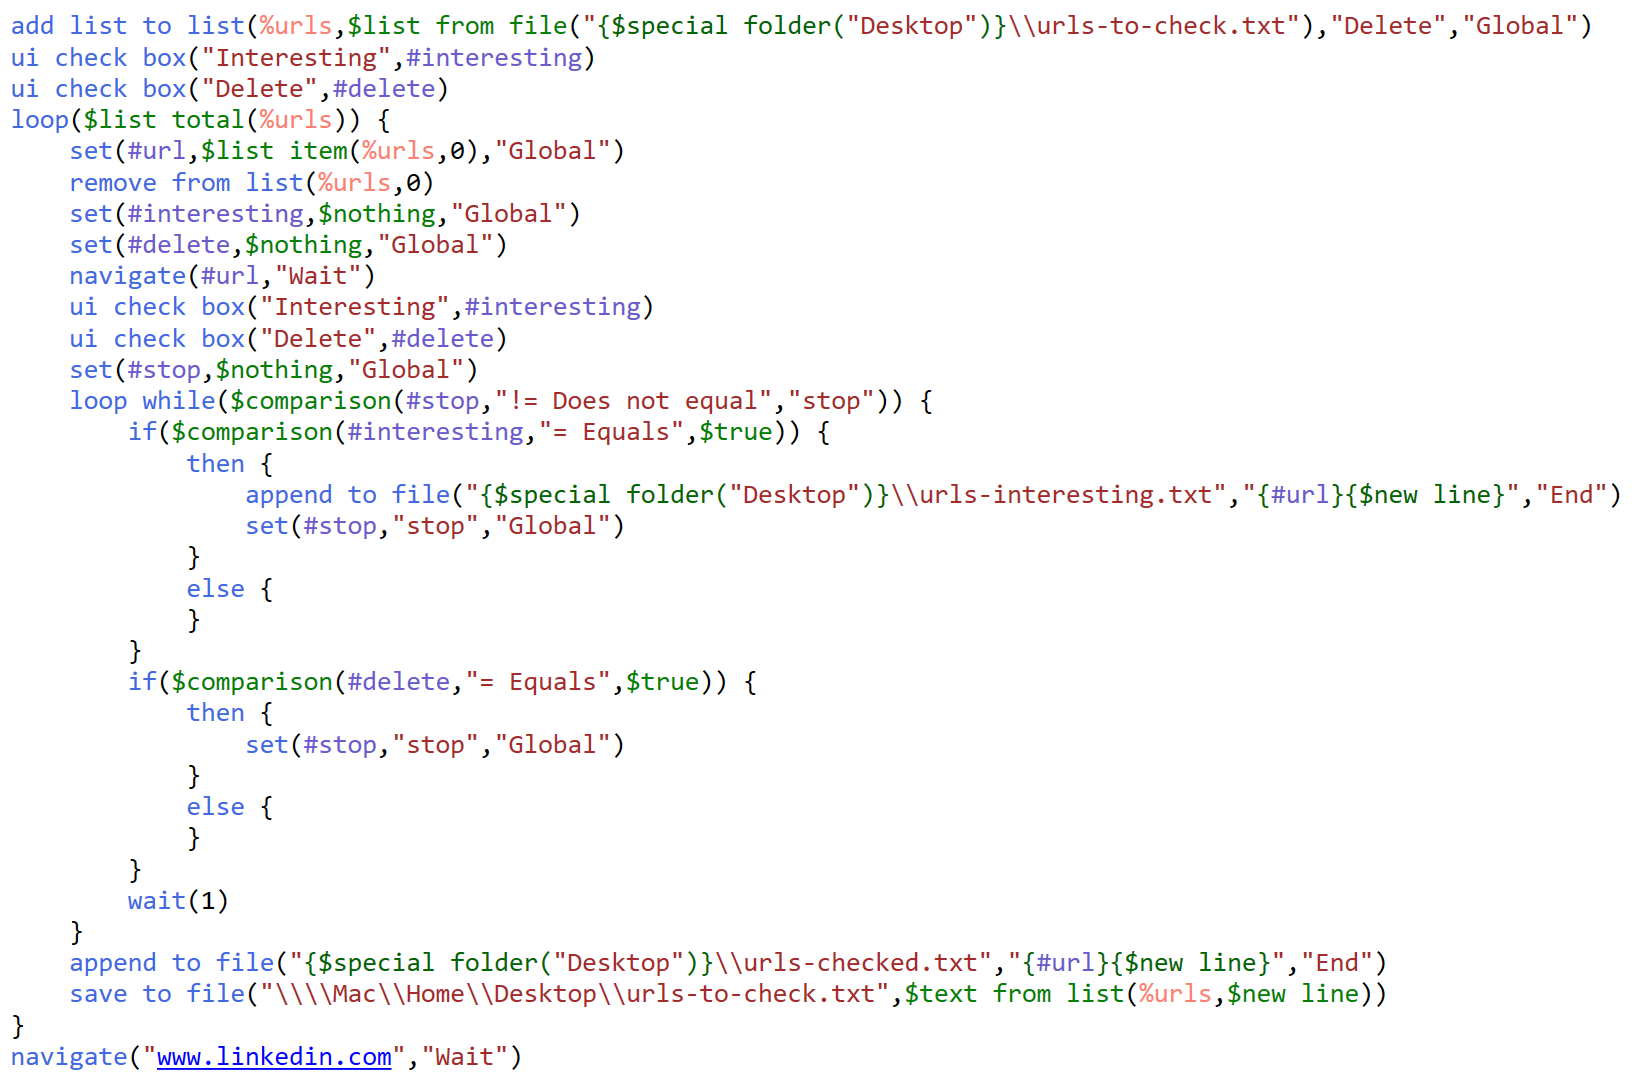
Finally, I decided to get the list of every content item’s URL, therefore my script first visits the Zope Management Interface, creates a Python script with the following content:

for i in context.portal_catalog.searchResults(Language=''): print i.getURL()
return printed

Then it runs the above script and saves the output of the whole list of URLs in a text file.

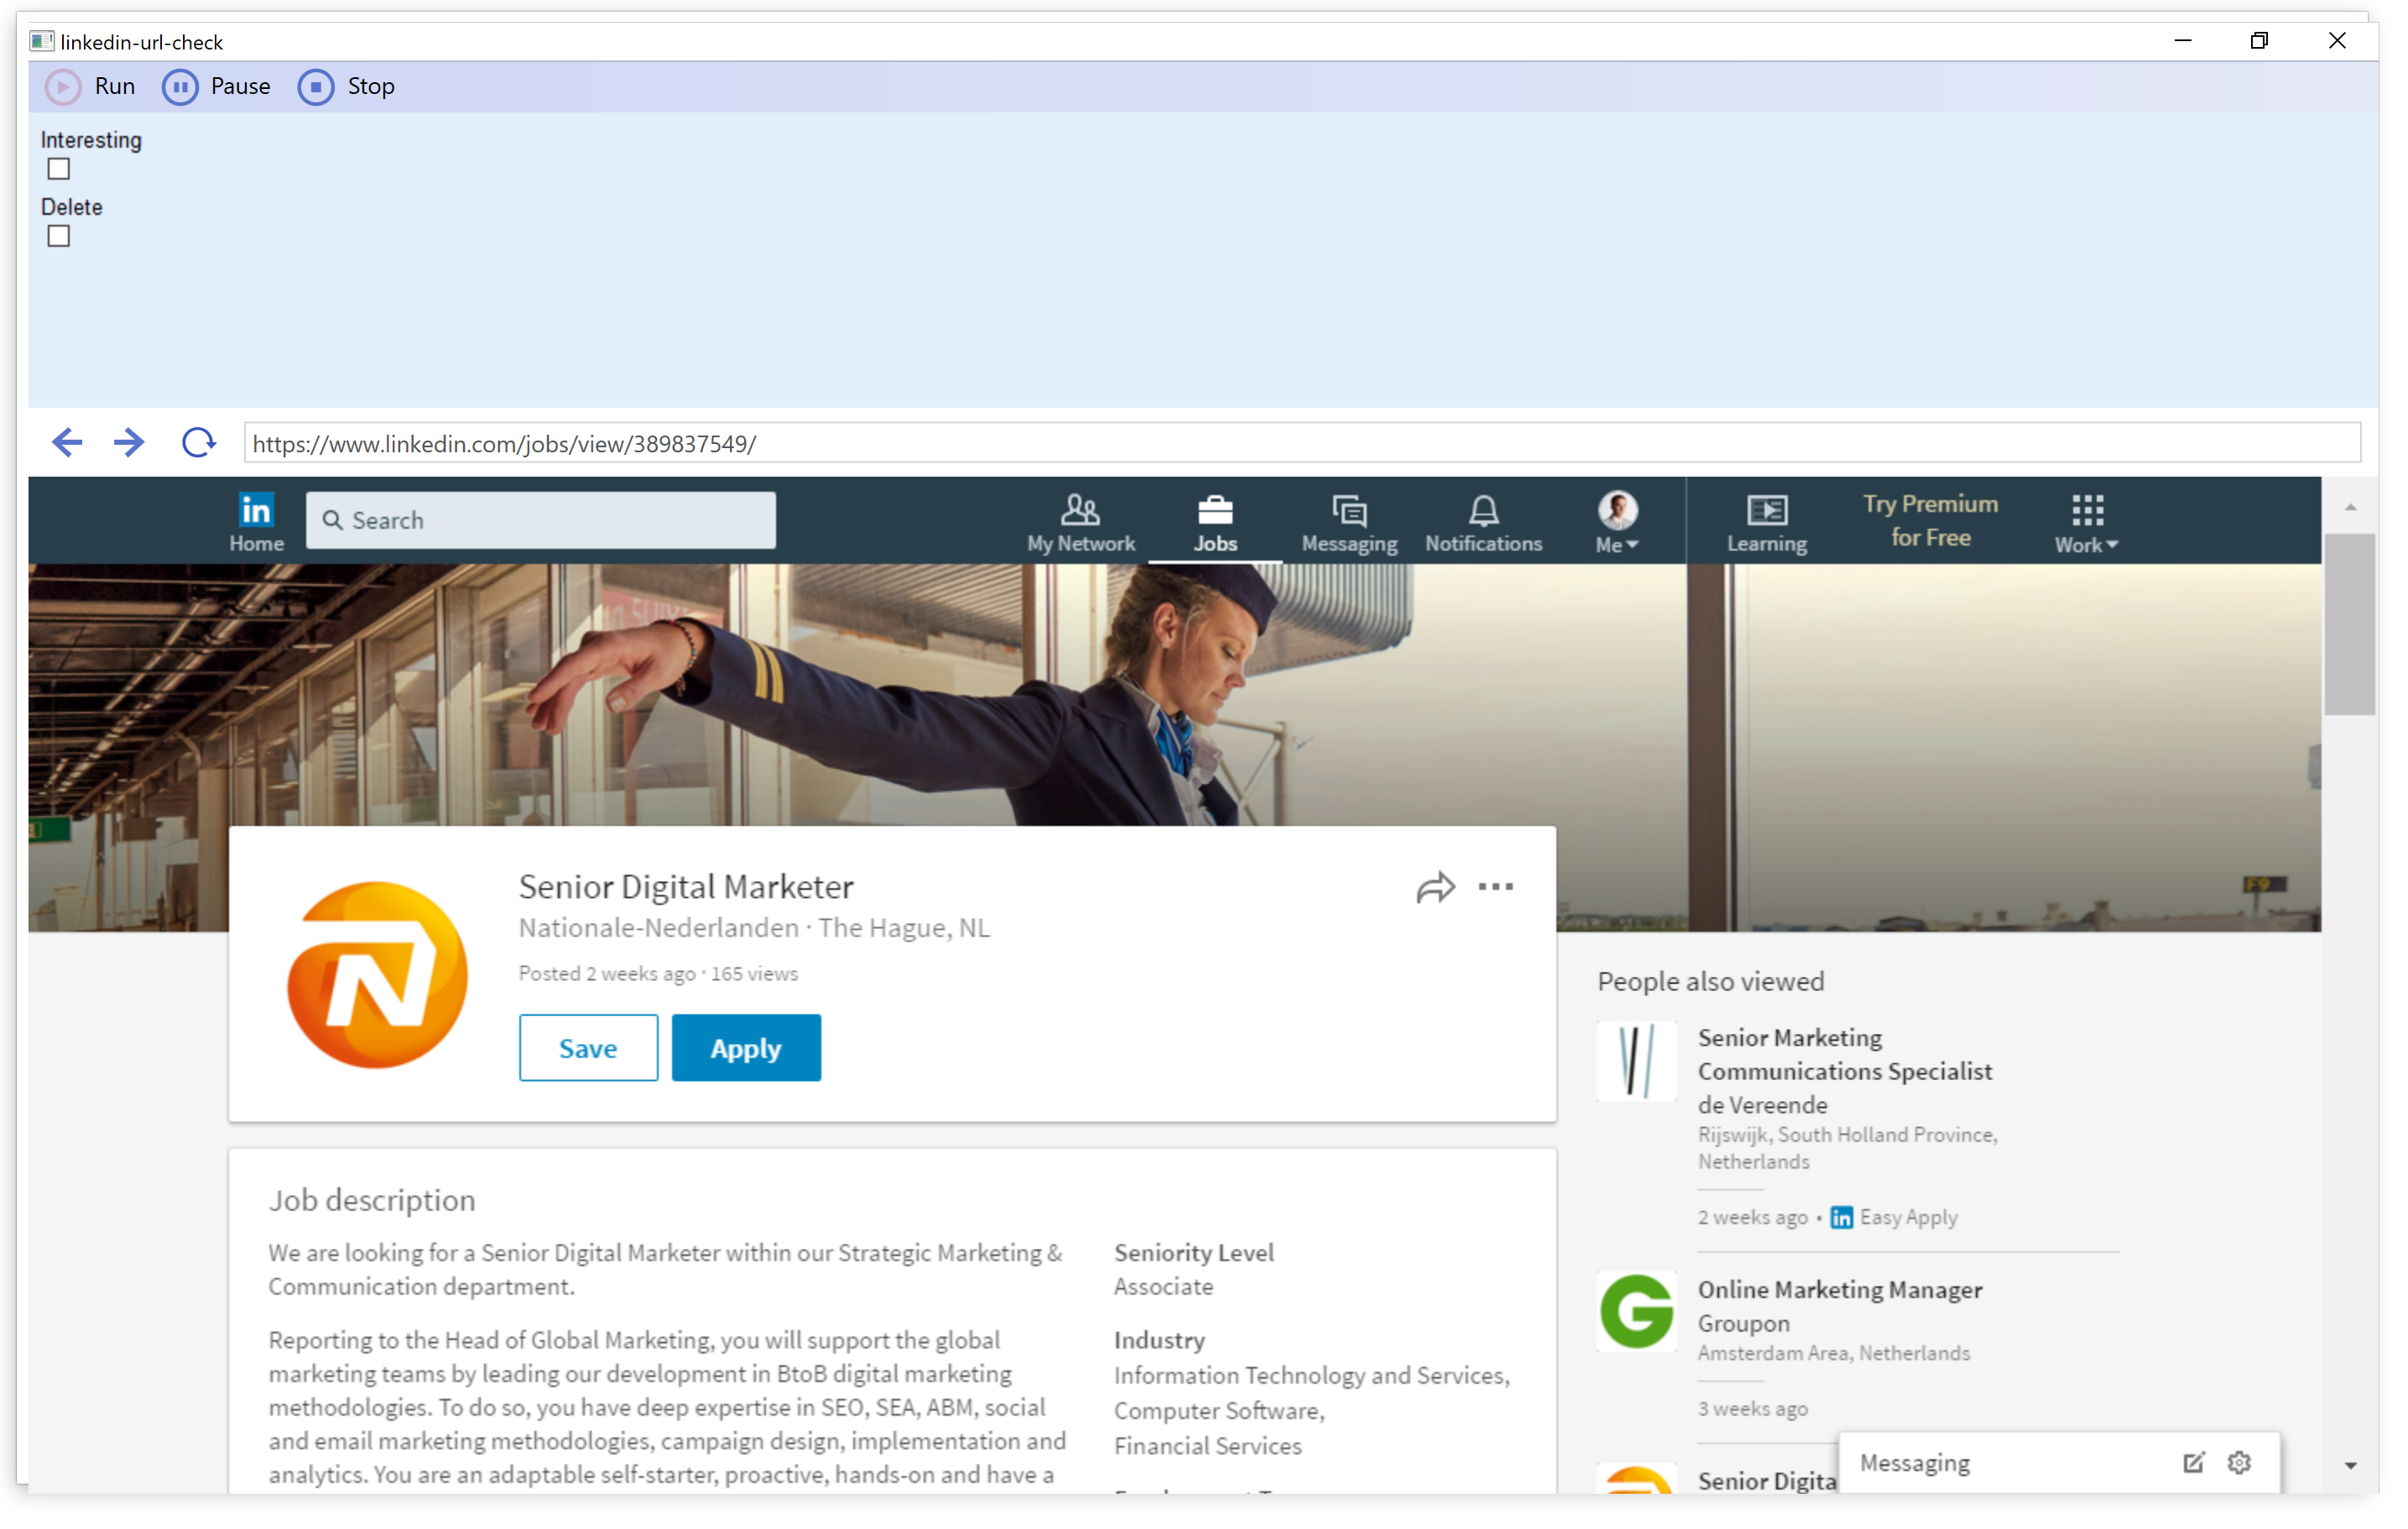
b.)  getting all the attributes

First I thought that it would be enough to open the edit page of every content item ( {-Variable.url-}/edit ), because every attribute could be extracted from there, but it turned out that for instance the Last Modified date is not listed there, or at least I could not find it, so first I had to open up the ZMI at the {-Variable.url-}/manage_metadata screen to figure out this information. Also, the workflow status was easier to get from the {-Variable.url-}/manage_workflowsTab page.

But then the script opens the {-Variable.url-}/edit page and scrapes basically every input, textarea and select fields except the hidden ones, plus it gets the list of parents from the breadcrumb menu and computes the hierarchy level.

In the next step, it opens the folder content page of its parent ( {-Variable.url-}/../@@folder_contents?show_all=true ) to figure out the position of that content item in its folder, so that later the menu order could be set.

It also downloads images stored as leadImages for news items and similar content types, plus the image itself for the image content type into a similar folder structure to the site’s original folders.

Finally, it adds a new line to the .csv file containing all the common attributes plus the ones who are specific to certain content types. Because of these latter field categories, I always save in the following format: {field name}::{field value} pairs separated by tab characters.

Step #2: Uploading content to the new site

a.) working with the scraped data

Once every content item is scraped with the first script, it’s time to fire the second one. It will process the log file produced by the scraper script. As the first column contains the hierarchy level and the position in the folder, the whole list of items can be sorted so that the script will start uploading the items located in the site root, and continue with the contained items. There is also a check in the script so if a parent item is not found, then it will be skipped and logged – so that you can identify those content items which were not listed somehow (don’t ask me why) in the very first step by querying the Plone database.

b.) decide what to do with different content types

For some content types, like the Document and News Item, it is quite obvious what to do: you can pair the Title, Description/Excerpt and Body text. With some ”folderish” content types like the Folder and Ploneboard, the process can be quite similar.

I decided that I would not create a separate Page or Post for Images. Where they are embedded in documents, I will just upload them to WordPress’ Media Library and insert them as you would normally do with WordPress. But where images were just listed with a thumbnail-based folder view, there I would manually add a WordPress Gallery item to the parent page.

I had a couple of Link items, there I also opted for not creating a separate page/post for them, but rather listing these link items on their parent page, that is only adding a header, link and a description to the Body text of parent pages. I also did something similar with the PloneBoard forum conversations: while these were separate content items in Plone, I just concatenated them to one page in WordPress.

Apart from these modifications, I decided to skip the Topic and Collage items, on one hand, both serve for listing content on one page, and on the other hand they basically mean quite a difficult setup to reproduce: perhaps you can create something similar with the AutoNav plugin, but it is far from obvious, and therefore the better if you really do it manually – if you need to do it at all.

I decided to use Pages for every kind of content, even for the News Item content types used in the Blog section of the old Plone site. I opted for this because pages can have parents and menu (folder) order, similarly to Plone’s structure, but of course, based on the logic of your old site, they could be translated as Posts as well.

c.) Logging what has been uploaded

Once the post/page has been created, it is important to get its ID and log it along with the attributes of the original content. Later on, you can use this information if you want to replace internal links, and it is also important in case something goes wrong. Then you can remove all the uploaded content by their WordPress IDs, and restart the process.

d.) Debugging and error handling

One of the peculiar problems with this ”imitating a manual data extraction / manual data entry” is rooted in the fact that the process takes quite a lot of time. I guess every web page fails to load quite frequently, you just would not notice it as you are usually not downloading hundreds of pages from a server. But in our case, if a page is not loaded, then we can miss a certain piece of content – and believe me, this happens quite often. Therefore every script has to be written with this in mind.

The first, scraper script, for instance, can be restarted when an error occurs, but most importantly it won’t start the whole process from the start, just continue the process where it stopped, finding out the next thing to do by analysing the previously written log files.

But when you start uploading the stuff you want to migrate, errors might occur even more frequently. On one hand, you will be surprised how many times your website will fail to respond, fail to save your content. It’s because normally you never invoke that many web pages or you never try to save so many new pages to see your site dropping your request or failing to respond. On the other hand, when you start to create the content at the new site, only then you will see if something went wrong by scraping the content, or then you will figure out if you have forgotten to scrape a necessary information, etc. For all these reasons, the best thing is to run the upload process in debug mode – so you can effectively see which step is happening right now, and if a page is not loaded for some reason, you can go to the site and check whether the page has been uploaded, just the confirmation was not displayed, or you should restart the upload process of that item.

In addition to that, I had to create a short script which was used in case something went entirely wrong: it would just delete every previously uploaded page (sometimes when there are already other content items on the new page, it is not straightforward to find out which content should be deleted).

Step #3: postprocessing content

a.) updating internal links and image references

There are certain steps you can accomplish only when every content item is already uploaded to the new site: for instance replacing the URLs of old internal links to the new WordPress ID-based links (which is better to use than the permalinks, just because if you, later on, fancy to restructure the migrated site, you will not break any internal link).

Therefore the post-processing script will open every uploaded content item for editing, gather all the URLs in href (and src) attributes, and replace them with the {-Variable.domainprefix-}{-Variable.domain-}/?p={-Variable.postid-} URLs. Things become tricky if originally relative URLs have been used – even more tricky when you consider Zope’s interesting concept called inheritance, so it’s better to translate relative URLs to absolute URLs before you attempt to find the WordPress ID belonging to the referenced content item in the log of the uploaded content.

When it is about replacing the URL of an embedded image (that is changing the reference from the old site to the new one), it is advisable to open the media item’s edit page: {-Variable.domain-}/wp-admin/post.php?post={-Variable.postid-}&action=edit and figure out the image’s file name as it is uploaded.

b.) handling private content items

There is also one more thing to do if you happen to have some content on the old site hidden from the public. Unfortunately, there is a WordPress bug, which has not been fixed during the last eight years: https://core.trac.wordpress.org/ticket/8592 . That prevents me from setting private status right when I upload the content in the previous step. The problem is rooted in the fact that if a parent page’s visibility is set to private, it will not show up in the dropdown list of parent pages on the edit screen either when you open one of the private page’s siblings, or if you plan to create a new sibling page. Therefore editing a page with a parent page having a private status will change the page’s parent to root – and similarly, your recently uploaded page will be created in the site’s root.

In theory, you could install a plugin called Inclusive Parents, but in practice, your site will throw frequent errors when you resort to this kind of ”hacking a bug with a plugin” solution.

Summary

Translating the logic and the structure of a Plone website to a WordPress-based site is not that straightforward. Even if you don’t have to deal with specific content types created by plugins such as Plomino of Ploneboard, you might want upload Links, Folders, News Items in a specific format other than a WordPress Post item. Also, Images are handled in a very different way in both content management systems, causing a couple of headaches too. This might be one big reason why there are no simple export/import add-ons between these two CMSes. Luckily enough with the web automation approach using software packages like Zennoposter (or Ubot Studio), you can build your own Plone to WordPress migration process. Should you need my scripts as a basis for that, don’t hesitate to drop me a line!


Six years ago, when we were pretty much in mass link building and link directory submissions, this script literally substituted a half-time employee, as it helped us to automatically check the presence of our links on various link directory sites. Although there are a couple of link checkers covering the use case when you know the specific URLs where to look for your links or an entire site is to be crawled in search of a link, but my directory link checker script does something different. You just have to enter the list of link directory domains where your links have been submitted and this script just tells you if those links have already been approved or not. This proved to be a very handy script for creating link building reports for our clients.

My very first web automation script

It took more than a week to write this script, and finally, when it was ready, It took again a week to re-write the whole thing from the ground up again. Way back then the challenge was that in many link directories you would never know the URL of the subpage where your submitted link showed up once it had been approved, so the only thing you could do is to check the mailboxes used for link building and go through the emails which were about submission approvals, plus open the sites and checking whether the links are already online – all of this made by hand. Obviously, gathering the list of successful submissions meant a lot of manual labour.

(The link submission process itself was already highly automated as we had been using a semi-automated link directory submission software, which meant a good compromise between speed and accuracy —as before submitting the links, we could choose the best category by hand, or enter appropriate data in a couple of directory-specific submission form fields.)

The logic of the link checking process

Using search engines to find the links

As the above, simplified diagram outlines, the script first scrapes the search engine search results restricted to the link directory domain, using search expressions like:

promoteddomain.com site:linkdirectorydomain.com

It crawls all the URLs listed as a result for these queries and if a link is found there, it logs the data of the successful link submission, loads the following link directory domain name and starts the process again.

Searching with the site search function of link directories

But if it fails to find traces of the submitted links with a web search engine (for instance Google or Bing), then it attempts to make a site search on the link directory page itself. As some directories are already linking the promoted domain from the search result page, the script might already succeed here. But if not, it starts to loop through the subpages listed as search results, loading each of these pages and checking the presence of the outgoing links pointing to the promoted domains.

Figuring out which internal links are search results

I could have created a database for each link directory, specifying the necessary parameters for doing a site search and evaluating it. Figuring out these parameters for each directory site, such as the search query URL schema and the regular expression to identify which internal URLs are search results on a site search result page. In this case the script could quickly and efficiently check the presence of links in the already known link directories, but the problem was that we had been constantly adding a lot of new directories to our database, plus as we had been doing link building in many different languages, it would have meant a lot of extra work to create and maintain such a database of parameters for thousands of link directories.

Therefore, I opted for a slower, brute-force solution which meant at least one extra query: searching for something nonsense, random string (such as the date and time), which ensured that no search results were displayed for it. Comparing the internal links of this with the normal search result pages, the difference shows us which internal links are search results, and which are other navigational, e.g. header or footer links of the page template.

The detailed link checking process

The below process seems to be a lot more complicated than the previous one, but there are good reasons for it. Mostly because I wanted to include certain modules only once, and re-use them as much as possible so that later on I could easily add improvements to the process. Interacting with many different kinds of websites is always a tricky issue, something you have to constantly refine. For instance, your regular expression does a perfect job on hundreds of sites but eventually fails on a specific web page.

Identifying search forms

On the other hand, there is a second trick apart from figuring out the search result links, that is how to find out which form is a search form, and what should be done to submit that search query? Here again, I opted for the brute-force solution: the script enumerates all the forms on the link directory home page and tries to submit these forms using search queries like the promoteddomainname.com or {specific keyword combinations used in link submission texts}. If upon submitting the first form, there will be no results —just because the submitted link is not yet listed in the directory— it attempts to submit the second form, even if it is a login form.

Attempting to submit forms

Similarly, if the submit button can be easily found, the script attempts to submit the form by either clicking on other elements where chances are high that it could submit the search form with or emulating the keystroke of the enter button while the cursor is in the search field, etc.

Loops

As you can see, there are a lot of loops in this process given the brute-force nature of the script. First, it loads the link directory to work with, then it loops through the search keywords you will use to find traces of your submitted links (at least there should be two expressions: the promoted domain name itself and a specific brand or a very specific keyword combination you have included in any link submission text you have spun —something to take into consideration as early as setting up your link submission project.)

Controls

There are subsequent steps like home, search, list (not always a meaningful nomenclature, but nevermind). In every step, a different module is called. If the module exits with success then it returns to the OK branch, if not, then to the NO branch. Depending on the value of the step variable, these two branches point to different modules, that is if it could not succeed with one search method then it goes on to try another one.

Your very own free link checker script

The script has been created with ZennoPoster, a powerful web automation tool, so first, you have to get and install this wonderful piece of software. Then click here to download the script.

Feel free to use, adapt and re-share it under the following terms: https://creativecommons.org/licenses/by-sa/4.0/ and please point a link to this page or to www.jaroli.hu.

Notes

If you already know ZennoPoster and/or find some of the solutions quite odd: Well, the script was originally written with ZennoPoster 3 way back in 2012, but soon afterwards an entirely rewritten ZennoPoster was brought to the market, with a lot of new concepts and many advancements in debugging, therefore I had to rewrite the entire script, but I just wanted to keep the changes to the minimum, like using lists instead of files or using switch boxes instead of a series of if boxes: as you can observe in the below screen capture which shows the imported Zenno3 script along with the recently rewritten one.

LinkedIn is a really cool platform when it comes to job search—or looking for your next step in your career, whatever. But what can you do when the site lacks a couple of vital features, and therefore it just wastes your time unnecessarily? Plus, how can you make sure that you have seen all the potentially interesting job offers when there are a couple of hundreds of positions available in your region?

Reading through hundreds of job offers?

Yes, I might be in a unique situation, where many circumstances just do not matter that much, so perhaps I keep more on my radar and browse through more adverts than an ordinary—or a casual job hunter. And this is where my problem is rooted: it is just too cumbersome to regularly check new job adverts on LinkedIn. Imagine that you have to enter many keywords one by one, then enter the location, set the desired distance radius, sort them by the date and start scrolling through the list, click each job offer which might seem interesting—judged by the search result page excerpt. Usually, you end up checking many ads you have already seen, again and again.

Save button for Job offers is just not enough

The whole process could be much easier with a simple feature like a button next to the Save/Unsave button with the text ”That’s not for me” or simply “Hide”. Luckily, I can quickly write a script with a web automation software to implement some of the missing functions of LinkedIN—or any other web site. However, the vast majority of ZennoPoster or Ubot Studio users are using these pieces of software to build bots which scrape a considerable amount of information from LinkedIn (something that LinkedIn hates and tries to prevent as much as possible), but you can use these tools for legitimate purposes too: to hack together something which provides you with the missing features.

It will not work with Ubot Studio alone

Ubot Studio has a nice feature I needed. It allows you to combine a web browser window with an additional user interface for data input, therefore I had initially started to implement this simple script in Ubot. Unfortunately, again I found some very basic obstacles which prevented me from building anything usable. <rant begins> To be honest, Ubot is just the least stable piece of software I have ever seen. If you take into consideration its price too, I think Ubot could be nominated for the title of the most time and money wasting application ever. I have already wasted so much time because of its frequent crashes, inability to deal with certain types of websites, unpredictable behavior, etc., that I always regret when I pay for an upgrade again. As I mentioned there are only two features why I still keep on struggling with this tool: the additional user interface and the ability to easily compile standalone .exe files for the bots. All in all, if I logged in to LinkedIN, Ubot just could not detect anything on the web page loaded, and tech support had no solution for that either — which is a shame and gives me the feeling that something is just screwed up with this tool from the ground up. <rant ends>

Let’s write two scripts then!

This is why I fired up ZennoPoster, and put together a simple script—without any problems. It logs in to my LinkedIN profile, sets the location and enters the keywords for job search, like online marketing, digital marketing, social media, google, facebook, adwords, seo, hongarije, hongaars, archicad, spanish, hungarian, hungary, marketing, marketeer, etc. Then it goes through the search results list by clicking on the pagination links, and scrapes all the job advert links to a plain text list ensuring that the link is not already listed among those which have been checked previously. It also checks the presence of the keywords on the exclusion list, such as recruit, stage, stagiair, intern, php(\ |-), javascript, frontend, backend, front-end, back-end, webdeveloper, \.net\, etc. and omit these job offers obviously not made for me.

Step #2 – back to Ubot Studio!

Now, I have a URL list of all the job offers which have certain chance to be promising for me. The next step is to read through them as quickly as possible—we are talking about hundreds of job offers. Sometimes there are many false positives: for instance, if a recruiter company includes phrases like ”visit our Facebook page”, in each of their job descriptions, then the fact that I am looking for Facebook-related jobs with the ”facebook” keyword just makes everything much more difficult. In addition to that, I could find a couple of interesting job offers which did not match any of the specific keywords like ”online marketing”, only the very generic ones like ”marketing”.

I have already had similar, very simple bots written in Ubot for going through a long list of URLs to add feedback to every loaded web page and save back the URLs with the manually added data. (Think about quickly tagging or writing titles for hundreds of products in a web shop while understanding what those products are really about.) So I just quickly modified an older script. It just loads one job offer page, waits until I click an appropriate check box: either ”Interesting” or ”Delete, and then it automatically loads the next web page while administering the process by adding the URL to the list of URLs already checked plus to the list of interesting job adverts if I clicked the corresponding box. With this method I could so quickly go through hundreds of job offers that once LinkedIn thought I am a bot (as I was logged in, since I also wanted to save some of the interesting jobs), and practically did not let me do anything without solving those silly captchas again about cars, roads and road signs, so I had to give up using LinkedIn for a day or so.

For someone who cannot just that quickly write web automation scripts, it might not have been worth setting up an automation hack for this case, but for me, I think it was worth it. On one hand, I guess the fact that I don’t speak Dutch (yet) will make my job hunting a little bit longer than the average, so it will save a lot of time for me. On the other hand by reading through so many job descriptions, now I have a better understanding of what kind of jobs are available in The Hage area.

In this article I will show you how to migrate a site created with an old, and nowadays deprecated content management system to a contemporary CMS, using web automation tools – that is grabbing a site’s content by walking through it with bots imitating human visitors, and uploading it to the new site similarly, by acting just like a human editor.

More than a decade ago I started to build a very successful website with a simple yet powerful Zope-based Wiki engine called Zwiki. As both Wikis (with the one notable exception of Wikipedia) and Zope usage has been in decline for many years, I haven’t actively developed that site anymore, but as I did not want to lose its content, I decided to migrate it to WordPress.

Step #1: Scraping a Zwiki site

Getting structured content from a wiki

When moving a site, the first challenge is to download the website’s content in a structured format. As we are talking about a wiki-type site, there is a strong emphasis on the word: structured, as the basic philosophy of the wikis consists of adding content to one single page body field, and using certain kind of formatting notations inside of that one big content field to display the information in a format which resembles some structure. Zwiki, for instance, has a handy function which allows commenting and following others’ comment on any wiki page, but all the comments are to be added to the very same field where the actual page content is stored, therefore I had to find in the pages’ text where each comment begins, and store them separately from the content.

Dealing with the special content markup

Yet another challenge was that Zwiki, just as many of its counterparts, uses a specific, simpler-than-HTML kind of markup code, which cannot be recognised by any contemporary content management system, so I could not rely on the content I could get by opening all the pages for editing, so I had to scrape the public web pages, where the special markup is already interpreted and translated to ordinary HTML.

Imitating human visitors with web automation tools

As I have experience working with a few web scraping/web automation software my obvious choice was to scrape the Zwiki site as if a human visitor would click through each and every link on the page and download its content. This way you are not limited by the export/import formats a certain CMS would offer when it comes to acquiring and uploading content, but you can get whatever part of the content you want, and process them with whatever regular expressions you want and log the results in any format. If a human visitor can walk through the entire site, you can grab all the information.

The logic behind the scraper script

Wiki-based content management systems tend to have a feature which greatly simplifies the content scraping process: they usually have a wiki contents page where all the pages of the wiki are listed. Therefore it seemed to be a very easy task to get all the content I needed to move: just open the contents page, scrape all the links, go through the list of them and visit, download and post-process each one. As an output, I have generated a .csv file where the page hierarchy, that is all the parent pages has been logged, another .csv file where the actual content of each page has been logged with a few pieces of key information such as title, URL or last modified date. This last piece of information could be obtained by visiting each wiki page’s history sub page and reading the dates of previous changes listed there.  The third file had every comment in a separate row, extracted by regular expressions from the page content. I have also generated another file with the raw content for debugging purposes. It records the page content plus the comments in their original format so that if something went wrong with the processing of the comments, the original source could be at hand.

Putting it all together with UBot Studio

As the whole process didn’t seem to be too difficult, I opted for using Ubot Studio for downloading and structuring the site’s content. It is marketed as an automation tool for internet marketers, but to be honest its main purpose was once to scrape and spam websites by link submissions, comments, etc. But nevertheless it can be used for various web automation purposes, and one of its key function that the Bots I create can be compiled in a .exe format, which can be run on any Windows computer, without having to buy the software itself. I would not publish this executable as I don’t want anyone to play around with scraping Zwiki sites, thus putting an unnecessary load on their servers, but feel free to contact me by commenting this page or dropping me a mail (kedves /at/ oldalgazda /dot/ hu) if you need that .exe file to migrate your Zwiki site as well.

Another interesting feature of Ubot is that although its primary interface is a visual programming UI, you can still switch to code view, where you can edit the script as if it was coded in an ”ordinary” programming language. The Zwiki scraper script, for instance, looks like this below in code view. If you have some patience, you can go through the script and understand what each step did, and see which regular expressions I used when structuring the data:

 ui text box("Domain to scrape (without http(s)://):",#domain)
 allow javascript("No")
 navigate("{#domain}/FrontPage/contents","Wait")
 wait for browser event("Everything Loaded","")
 wait(5)
 set(#scraped,$scrape attribute(<class="formcontent">,"innerhtml"),"Global")
 add list to list(%pageurls,$find regular expression(#scraped,"(?<=href=\")[^\"]+"),"Delete","Global")
 loop($list total(%pageurls)) {
     set(#pageurl,$list item(%pageurls,1),"Global")
     navigate(#pageurl,"Wait")
     wait for browser event("Everything Loaded","")
     wait(5)
     set(#content,$scrape attribute(<class="content">,"innerhtml"),"Global")
     set(#content,$replace regular expression(#content,"<a\\ class=\"new\\ .+?(?=</a>)</a>","<!-- no wikipage yet -->"),"Global")
     set(#content,$replace(#content,$new line,$nothing),"Global")
     set(#content,$replace regular expression(#content,"\\t"," "),"Global")
     set(#contentonly,$replace regular expression(#content,"<p><div\\ class=\"subtopics\"><a\\ name=\"subtopics\">.+",$nothing),"Global")
     set(#contentonly,$replace regular expression(#contentonly,"<p><a name=\"comments\">.+",$nothing),"Global")
     set(#contentonly,$replace regular expression(#contentonly,"<a name=\"bottom\">.+",$nothing),"Global")
     add list to list(%parents,$scrape attribute(<class="outline expandable">,"innertext"),"Delete","Global")
     set(#parentlist,$list item(%parents,0),"Global")
     clear list(%parents)
     add list to list(%parents,$list from text(#parentlist,$new line),"Delete","Global")
     set(#parentlist,$replace(#parentlist,$new line,";"),"Global")
     set(#posttitle,$list item(%parents,$eval($subtract($list total(%parents),1))),"Global")
     set(#posttitle,$replace(#posttitle," ...",$nothing),"Global")
     if($comparison($list total(%parents),"> Greater than",1)) {
         then {
             set(#parent,$list item(%parents,$eval($subtract($list total(%parents),2))),"Global")
         }
         else {
             set(#parent,$nothing,"Global")
         }
     }
     append to file("{$special folder("Desktop")}\\{#domain}-page-hierarchy.csv","{#pageurl}    {#posttitle}    {#parent}    {#parentlist}    {$new line}","End")
     clear list(%parents)
     add list to list(%comments,$find regular expression(#content,"<p><a[^>]+name=\"msg.+?(?=<p><a[^>]+name=\"msg.+)"),"Delete","Global")
     loop($list total(%comments)) {
         set(#comment,$list item(%comments,0),"Global")
         set(#date,$find regular expression(#comment,"(?<=name=\"msg)[^@]+"),"Global")
         set(#title,$find regular expression(#comment,"(?<=<b>).+?(?=</b>\\ --)"),"Global")
         set(#title,$replace regular expression(#title,"<[^>]+>",$nothing),"Global")
         set(#author,$find regular expression(#comment,"(?<=</b>\\ --).+?(?=<a\\ href=\"{#pageurl})"),"Global")
         set(#author,$replace regular expression(#author,"<[^>]+>",$nothing),"Global")
         set(#author,$replace regular expression(#author,",\\ *$",$nothing),"Global")
         set(#comment,$find regular expression(#comment,"(?<=<br(|\\ /)>).+"),"Global")
         set(#comment,"<p>{#comment}","Global")
         set(#comment,$replace regular expression(#comment,"\\t"," "),"Global")
         append to file("{$special folder("Desktop")}\\{#domain}-page-comments.csv","    {#pageurl}    {#date}    {#title}    {#author}    {#comment}    {$new line}","End")
         remove from list(%comments,0)
     }
     navigate("{#pageurl}/history","Wait")
     wait for browser event("Everything Loaded","")
     wait(5)
     scrape table(<outerhtml=w"<table>*">,&edithistory)
     set(#lastedited,$table cell(&edithistory,0,4),"Global")
     clear table(&edithistory)
     append to file("{$special folder("Desktop")}\\{#domain}-page-content-raw.csv","{#pageurl}    {#lastedited}    {#content}    {$new line}","End")
     append to file("{$special folder("Desktop")}\\{#domain}-page-content-only.csv","{#pageurl}    {#posttitle}    {#lastedited}    {#contentonly}    {$new line}","End")
     remove from list(%pageurls,0)
 }

Step #2 Uploading the content to WordPress

Now that I have all the necessary data downloaded to .csv files in a structured format, I needed to create other scripts to upload the content to a WordPress site. Here I opted for the same technique, that is imitating a human visitor, which hits the ”Create a new page” button each and every time, and fills all the edit fields with the data grabbed from the downloaded .csv files. More details about this part can be read here: From Plone to WordPress — Migrating a site with web automation tools